

Litcher Globe String Light Suspension Kit, Outdoor Light Guide Wire, Vinyl Coated Stainless Steel Steel Cable,Include 150fts Transparent PVC and 304 Stainless Steel Wire Cable, Turnbuckle and Hooks
-

Indira
> 3 dayInstalled with ease. I used this to hold up some items higher on my wall. I like it.
-
ElecShopper
> 3 dayNeeded for an indoor application to suspend lights for a corporate party. Easy to cut and hang. The poly coating prevented damage to the paint on the posts we mounted on. Loved that everything was in 1 kit.
-
Brenda D. Shapard
> 3 dayThis installation kit is well thought out to allow you to install string lights without multiple trips to the hardware store or your workshop. The components are of good quality and once you decide how best to string your lights they make your job easy. The package came ahead of schedule despite the heavy demand for deliveries due to the virus. The price is also very reasonable.
-
Gala61
> 3 dayWorks very well and is very strong support for outdoor hanging lights.
-
Yessenia Koepp MD
> 3 dayMade installing my outdoor lights easy
-
herb honaker
> 3 dayExcellent
-
Dexter Ford
> 3 dayI misread the application, and thought it would work on my Large Canopy. The product and shipping was fine, I just attempted to use on the wrong project.
-
Kevin Smith
> 3 dayQuality cable and gauge was exactly what was needed for a lightstring in the back yard. used some other more robust hardware for attaching to the house and used loop tie down straps to attach non-destructively to two trees - wrapping around medium sized branches.
-
Rejse10
Greater than one weekThis kit had everything I needed to securely fastened my string lights. They were hanging beautifully for over a year from the second story down to the ground level, until my landlady’s crazy friend cut them down. She said the tree service people needed them lowered, but I don’t trust her. She was probably high as a kite, climbed up to the light string, and cut them down. I’m so irritated about it, but I’m hoping to rehang them soon.
-
Chris Manning
> 3 dayVery impressed with this kit , especially for the price! I did have to change screws as the ones supplied were not for wood but not a big deal !


Brand Story
Litcher brand was founded in 1994 in Zhejiang, China
Our string light hanging kit was officially sold online in 2018. We constantly update our products all the way. We strive for excellence in hardware
Product Spec:
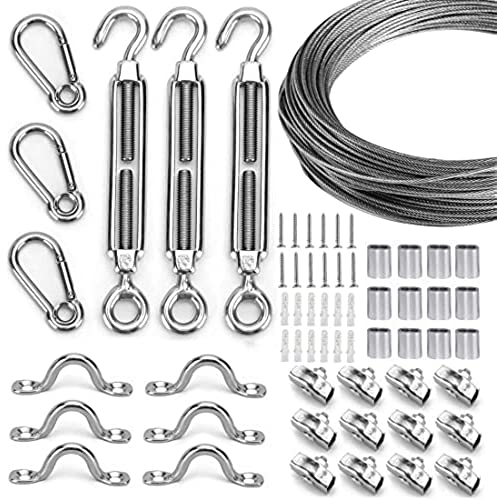
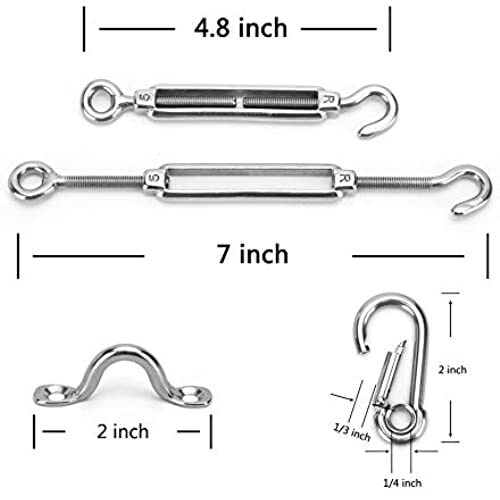
Turnbuckle: 3 Pcs (304 Stainless Steel,M5)
Snap Hook : 3 Pcs (304 Stainless Steel,M5)
Hump Screws : 6 Pcs (304 Stainless Steel,M5)
Rope Clamp: 12 Pcs (304 Stainless Steel,M5)

The most beautiful scenery is what you create for the people you love most
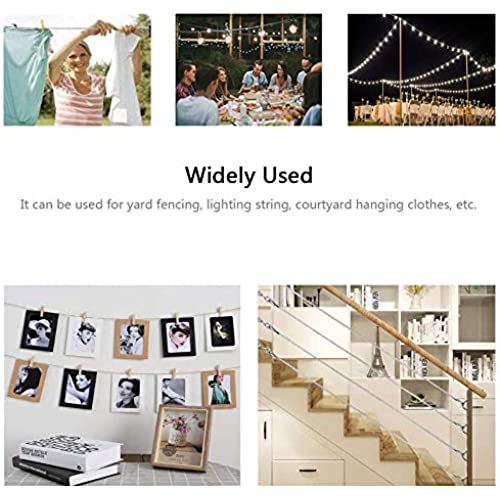
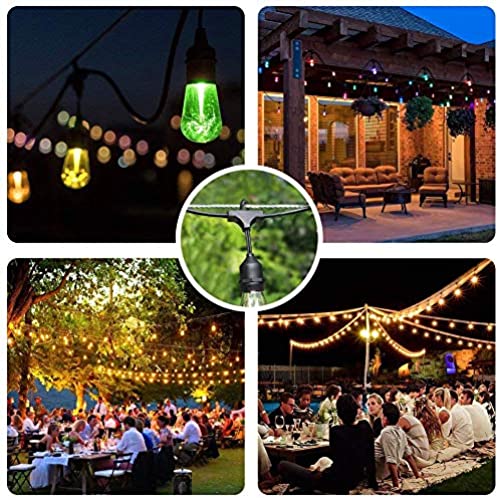
Waterproof strand for patio,garden,porch,Backyard Party Hanging Light.Outdoor and indoor suspension for lamps, clothes, Sun Shade Sails and Sundries others.
|
|
|
|
|
|---|---|---|---|
Vinyl-Coated 304 Stainless Steel CableFeatures insulation, strong weather resistance, waterproofness, rust and corrosion resistance as well as strong toughness.This outdoor light guide wire Perfect for hanging outdoor string lights. |
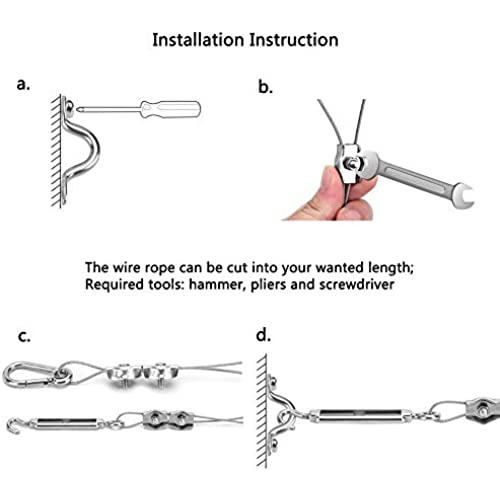
Heavy-duty 304 stainless steelThe use of the clamps makes the uninstall process very easy (+ User Guide included it). |
Easy to install and uninstallFlexible, Strong, Safe & Easy To Trim & Mount on walls and trees. |
Add best for youWe love to give it to you and hope you give it to others |


Your love for our String Lights Hanging Kit is our greatest encouragement. Thank you for your support!
|
|
|
|
|
|---|---|---|---|
|
|
|
|
|


Warm prompt:
This kit can not withstand too heavy items, please standardize the operation.
If you have any problems, please feel free Write to me!
