
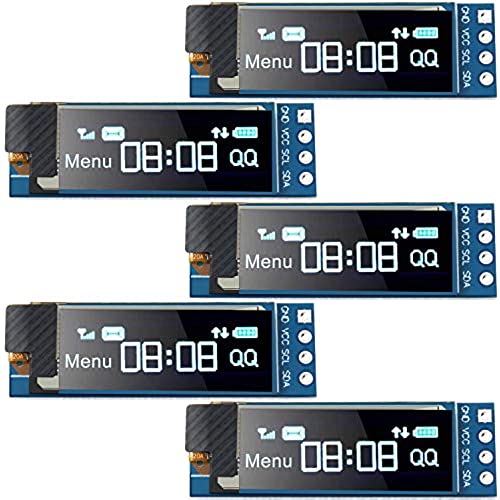


5 Pieces I2C Display Module 0.91 Inch I2C OLED Display Module Blue I2C OLED Screen Driver DC 3.3V~5V(Blue Display Color)
-

Peter Wicks
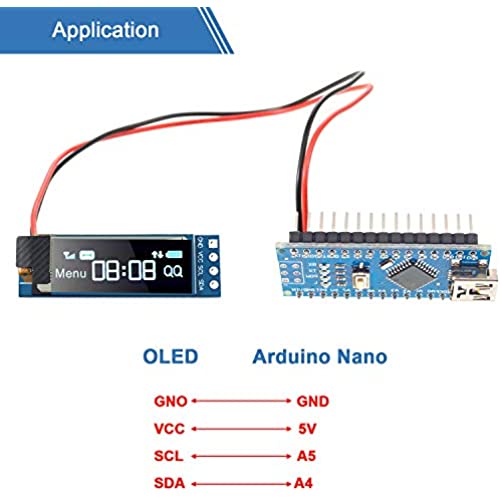
> 3 dayI am using an ESP8266 with ESPHome. This was very easy to wire up and configure. ESPHome has great documentation on their website on how to setup font sizes, and to write values/images.
-
Carroll Humphreys
> 3 dayGood quality for the money, easy to use with ‘ssd1306.py’ driver for MicroPython code Works well with Raspberry Pico using Thonny IDE
-
Jhon Fredy Rios
> 3 dayConcuerda con la descripcion, funcionan perfectamente.
-
Thomas Couey
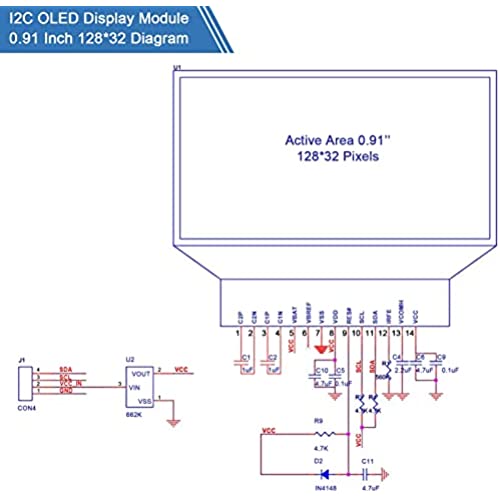
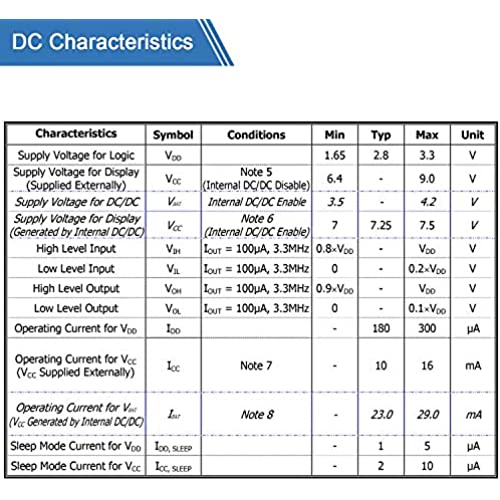
> 3 dayThese things are quite nice, especially for the price. As you can see in the pictures, I created a snap-on bezel for mine to make for a cleaner prototyping experience (file available at thingiverse, search for thing 4768895). The AdaFruit SSD1306 Arduino driver works great for these modules. You can also control with any I2C device, if you read the datasheet for the SSD1306, available on the internet. Make sure the copy down the specs from the description (or print) and keep with the parts for future reference. You can power and control this from 3V3 or 5V due to the integrated regulator... quite nice.
-
Barbaraa
> 3 dayThis is an awesome, tiny, high resolution OLED for any of your micro controller projects. It used the very common I2C bus, and runs on the SSD1306 display driver. 128x32 pixels gives you a nice sharp, crisp text output. Im very happy with these. This is a really good way to add a very compact LCD to your project. No need to add some big bulky backlit LED, go with this instead! I used the Adafruit SSD 1306 Libraries and they worked great. They are low power and bright. For the adafruit library examples, they really are over the top. There is no hello world essentially, so just do a google search for a hello world example for the libraries to get a basic starting point. Also, to rotate the display 180 Degrees, put in display. setRotation(2); in the setup. Basic usage for those libraries are.. display. display() ; display. clearDisplay() ; display. setTexSize(1-3) ; display. setCursor(0,0) ; // origin of text display. print(blah) display.println(-appended to last word blah, then new line ) ; As for the hardware, the displays are nice and small. If you think of your breadboard, they are 4 rows high, then about 12 slots wide. (Thats the entire board.) Voltage range is impressive and seems to operate at lower than 3.3, but Im running it on 4.5V and there are no problems. (Basically, 5v from the wall but through a diode on the arduino). It takes around 5ma. With a watch dog timer and adjustment I bet you could I get a whole pro mini project to run at under 3ma standby while keeping the display going. Refresh time on the display is very fast and cameras dont pick up any multiplexing/flicker. They did not come with headers, but the plated through holes are very well done and take solder well. The holes are pretty snug, which means its strong. It will be hard to desolder these after , so google some tricks on removing header pins to make your life easier!
-
Maverick
> 3 dayThis I2C Display Module work with no problems for the Arduino project I was working on. I personally like the Blue color LED it was easier for myself to read in any of the lighted conditions I was using this module in. There is plenty of online help and libraries for this unit just make sure you have the correct numbers for this display module when searching.
-
...^.^...
> 3 dayWorked well. The example code in Arduino IDE for the Adafruit SSD1306 Library worked and provided a start.
-
William Parish
> 3 dayThis will work nicely if I stack my pis in a cluster, since the height is about what Id have between pis anyway. Took a bit of fiddling to get the adafruit library to install, and as you can see in the image some extra control characters display from the example, but when I use it Ill make sure the text is more relevant to what I want. I had to turn down the contract on the picture because its a bright little thing, and was washing out the picture otherwise. I didnt mind not having the headers installed. While headers are nice at this breadboard stage, the other three I may solder wires to, and just have them end in plugs I can attach to the i2c bus. I think it makes sense for a bulk seller like this to omit the headers. Finding the address was trivial, but I couldnt find the manual referenced in the description. Turned out a few minutes on google got me the right instructions for a Pi though. Thats the great thing about the pi is the community support. Id be happy to buy them again if I found a need for more than 5 (cluster expansion maybe?).
-
Irina V.
Greater than one weekThe screen is evenly aligned, well glued. This item looks better than I was purchasing from other vendors before.
-
John
Greater than one weekI attach them to a mkr 1010 shield between the headers and use the adafruit oled library. Photo of a well monitor attached. This has, wifi, a real time clock, a watch dog timer, an oled display and a SD card under the side of the display. It is also connected to a Blynk mobile app for monitoring and control. The oleds begin to dim after 6 months or so of use. Best practice is not to have them on all of the time. I plan on adding a small motion sensor that turns the display on or off. .