
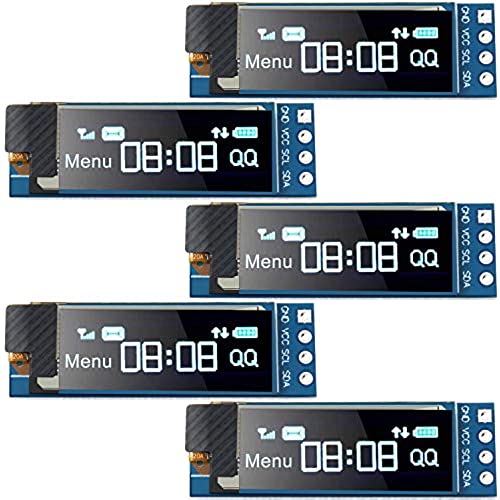


5 Pieces I2C Display Module 0.91 Inch I2C OLED Display Module Blue I2C OLED Screen Driver DC 3.3V~5V(Blue Display Color)
-

Ryan Peters
> 3 dayA bit smaller than I expected, but they are great little screens. Easy to read, and easy to use. Works perfect for displaying a little bar graph and some data.
-
Daniel N.
> 3 dayIs a copy of an Adafruit display and the Adafuit libs for Arduino work with this device. Just note, this is a very very tiny display. For reference the pins are 2.54mm pitch. Cant beat the price for what you get. Just note that I2C is slower than SPI, or high speed parallel so the refresh rate is low, but its still pretty quick.
-
Justin S.
> 3 dayNot sure if the product was changed since some of the reviews, but the ones I got worked fine with IC2 and 3v3 on my Raspberry Pi. Also, mine came with headers, but I had to solder them myself. I prefer that, since it makes them a lot more flexible. Just be aware. To the person complaining about a lack of a manual - common man. Its a an electronics component, youre going to need to google your specific application. Thats true for basically every electronics component ive ever ordered.
-
John P. Swails
02-04-20253 were duds. 2 worked with ssd adafruit. Thanks to good comments here that led me to finding right drivers
-
Sandra Heilman
> 3 dayThere is no documentation at all for these devices. It turns out that the Adafruit libraries work just fine IF you know that the IC2 address is 0x3C and change it in the examples. The brightness is just fine and they are quite cheap, but they are incredibly small.
-
P. Wilson
> 3 dayI think these will work well, but Ive not seen any info telling me what the I2C address is for the module... any information anyone can share ?
-
Javier Arias
> 3 dayI have been trying to make this work without luck. Seems device is detected (in 0x3C address) but no text/backlight on screen. Tested the 5, same result ....... maybe I am missing something (Will update in case this works). ———————————————- UPDATE: I used Adafruit library and all screens work flawesly, really happy with results
-
Barbaraa
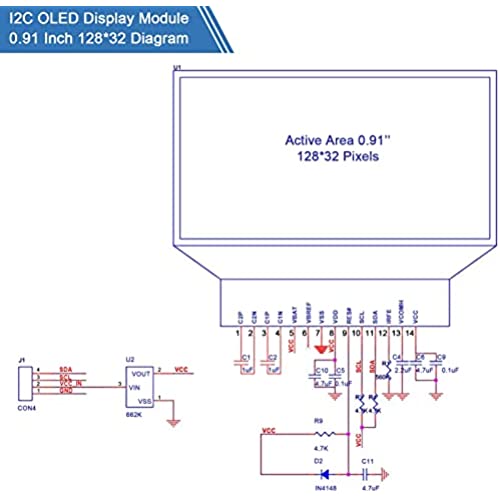
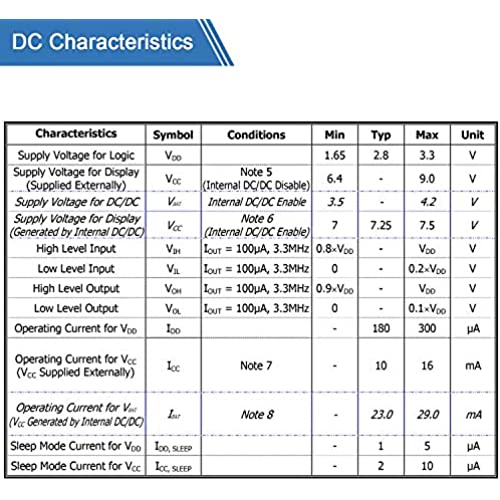
29-03-2025This is an awesome, tiny, high resolution OLED for any of your micro controller projects. It used the very common I2C bus, and runs on the SSD1306 display driver. 128x32 pixels gives you a nice sharp, crisp text output. Im very happy with these. This is a really good way to add a very compact LCD to your project. No need to add some big bulky backlit LED, go with this instead! I used the Adafruit SSD 1306 Libraries and they worked great. They are low power and bright. For the adafruit library examples, they really are over the top. There is no hello world essentially, so just do a google search for a hello world example for the libraries to get a basic starting point. Also, to rotate the display 180 Degrees, put in display. setRotation(2); in the setup. Basic usage for those libraries are.. display. display() ; display. clearDisplay() ; display. setTexSize(1-3) ; display. setCursor(0,0) ; // origin of text display. print(blah) display.println(-appended to last word blah, then new line ) ; As for the hardware, the displays are nice and small. If you think of your breadboard, they are 4 rows high, then about 12 slots wide. (Thats the entire board.) Voltage range is impressive and seems to operate at lower than 3.3, but Im running it on 4.5V and there are no problems. (Basically, 5v from the wall but through a diode on the arduino). It takes around 5ma. With a watch dog timer and adjustment I bet you could I get a whole pro mini project to run at under 3ma standby while keeping the display going. Refresh time on the display is very fast and cameras dont pick up any multiplexing/flicker. They did not come with headers, but the plated through holes are very well done and take solder well. The holes are pretty snug, which means its strong. It will be hard to desolder these after , so google some tricks on removing header pins to make your life easier!
-
=m=
> 3 dayGreat price per module and all five displays worked properly. However, the modules and 4-pin headers were all placed in a single bubble-wrap bag, then inside a small box. Individual ESD bags for each module would insure the modules did not rub against each other during shipping.
-
Johnnie N.
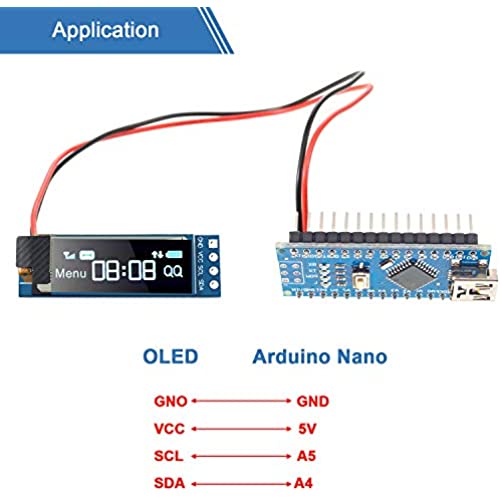
> 3 dayAfter some experimenting I came up with the following to use this with the Seeeduino XIAO in PlatformIO. Display GND --> XIAO GND Display VCC --> XIAO 3V3 (not 5V!) Display SDA --> XIAO SDA Display SCL --> XIAO SCL library used: lib_deps = olikraus/U8g2@^2.28.8 example main.cpp with some comments added: #include <Arduino.h> #include <U8x8lib.h> U8X8_SSD1306_128X32_UNIVISION_HW_I2C u8x8(/* reset=*/ U8X8_PIN_NONE); void setup(void) { u8x8.begin(); u8x8.setFlipMode(1); // set number from 1 to 3, the screen word will rotary 180 } void loop(void) { u8x8.setFont(u8x8_font_chroma48medium8_r); u8x8.setCursor(0, 0); // char row, col - not pixel u8x8.println(===============); // if string too long it wraps and flickers u8x8.println( Hello,); // println() advances to next row u8x8.println( World!); u8x8.println( ===============); u8x8.println( test test test=); // <- this will not be shown on the 4 line screen } Since all I am looking for in this display is a simple character output this library will work fine for me. I tried the Adafruit and the SeeedStudio OLED libraries and I assume I never got the device type correct for a few frustrating hours of trial and error and error. I was also able to get the graphics library to work on this using the following constructor: #include <U8g2lib.h> U8G2_SSD1306_128X32_UNIVISION_F_HW_I2C u8g2(U8G2_R0, U8X8_PIN_NONE);
