
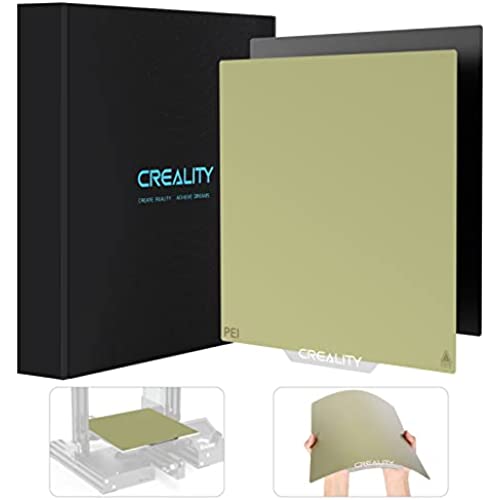
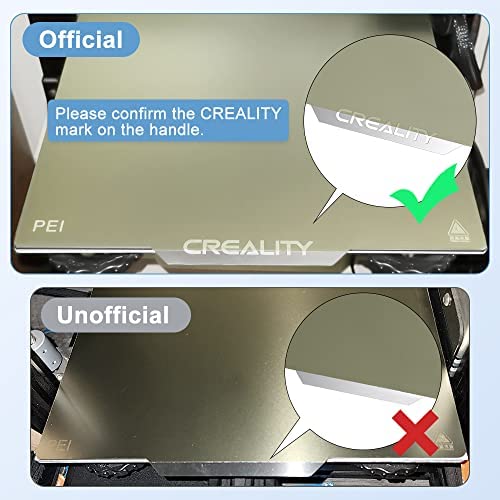


Creality 3D Official Ender 3 Bed Upgraded, PEI Sheet Removable Magnetic Flexible Heated Bed Plate Build Surface Bed Cover for Ender 3 S1/Ender 3 V2/Ender 3 Pro/Ender 5/Ender 5 Pro 3D Printer 235X235mm
-

Brenden Heath Lee
> 24 hourWas having adhesion issues with PETG... not anymore! Prints almost stick too well now. Was easy to swap for the ender 3 pro magnetic build plate.
-
Daniel J. West
> 24 hourI had problems getting the PLA material to remain attached to the original textured matte that came with the Ender3 v2 neo. Using a PEI matte made a huge difference. I have not had issues with my projects detaching from the printing matte since I started using it.
-
Josh schallus
> 24 hourLiterally the first print on a Creality printer, with a Creality bed using surprisingly the Creality PLA. Used 205 degrees Celsius on the hotend and 50 degrees on the bed. Print stuck well but even though leaving on the printer for maybe a half hour past hitting ambient temp of around 24-26, it didnt simply pop off like other say it should, or like it does on the textured PEI bed that I have. The fact that this is just a sticker is what makes it not worth it, from what I can tell most of the smooth beds are just that. Hopefully the pictures do it the injustice it deserves. It wasnt even the hardest print ever to remove, it took a little bit of tugging but, wow. Not only bubbles that were on the very perimeter of the print, but it seems there is a raised lump going all the way around it as if when I pulled it off it raised it enough to delaminate it and cause bubble sporadically to appear but also a line that will more than likely bubble up in the prints to come.
-
Boba
> 24 hourSo my first few prints where perfect. Then I messed up leveling and gouged the build plate. So I bought a new one. Same thing first few prints perfect. So perfect I was like why doesnt this printer just come with this bed. Then while feeling like I made one of my best 3d print purchases nothing would stick. I searched the internet to see what I might be doing wrong. Find a bunch of it doesnt stick reviews, but I could give up. I tried glue, nada, tried cleaning it with alcohol, no dice. So I decided to just try antibacterial hand soap and a fingernail brush, and boy am I glad I did. Its been nonstop printing ever since, knock on wood.
-
JT
> 24 hourI had several issues with adhesion for my prints. This bed fixed all the problems. Don’t forget to adjust your z-offset after installing it.
-
Jaime
> 24 hourGreat bed for my cr-10 v3. Fits perfect and I no longer need to use adhesive for my prints to stick.
-
Eddison
> 24 hourI have ran PEI magnetic sheets for about 6 months and find they are the best adhesion(with alcohol cleaning before every print). The release is fantastic especially for larger prints. So small print still need a little motivation. Downside is the sheets are a lot easier to damage(gouge) then glass. When running firm ware that allows negative z you have to be very careful not to trench the sheet. It does not ruin the sheet just makes it less effective.
-
Jason P.
> 24 hourI have been using this PEI Magnetic bed for a couple weeks now and I have zero complaints. The installation is simple, Clean the print bed with rubbing alcohol and a microfiber cloth, and carefully set the adhesive magnet down. The build plate does not feel flimsy, but has enough give to pop the print off. I love this one so much I bought a second PEI build plate for my other printer. It has great adhesion, but nothing is coming off that glass bed! In short, this is a great product! Buy this thing! Buy Two! It has made removing prints SO easy! :)
-
Last,First
> 24 hourHeavy duty print bed.
-
RSacky
> 24 hourIm using a new Creality Ender 3 Max Neo. **No need to apply the magnetic sheet** When I got my PEI sheet I was very apprehensive about applying the magnetic pad, which uses sticky adhesive on its backing to fasten permanently to the heat bed. If it didnt work as intended I would be stuck with a magnetic mat on my machine. It would very difficult to remove it, and clean off the adhesive (if at all possible). So I didnt use the magnetic sheet. I simply removed my glass plate and swapped in the gold spring steel PEI directly onto the heat bed. Its about half the thickness of the glass bed so I shoved a small piece of cardboard under each plate clip and it held snug. Of course, the bed needs to be manually raised a bit first to compensate for the thinner plate. To ensure that the PEI was laid perfectly, I positioned the printhead at all corners and the middle, measuring the distance with a sheet of paper (the paper should slide between the printhead and the plate with just a bit of resistance). Then I auto-leveled the bed. I have so far printed a dozen models, and they all held firm and printed perfectly. The best part... they popped off the PEI sheet with no effort at all. I didnt even need to remove the PEI and bend it. Bonus - not using the magnetic sheet allows the PEI to warm faster because it isnt insulated from the heat bed. And without applying the permanent magnetic sheet, I can easily swap back to the glass bed without the magnetic sheet insulating the heating process. After years of struggling with not enough adhesion, then way too much adhesion - its a dream come true.


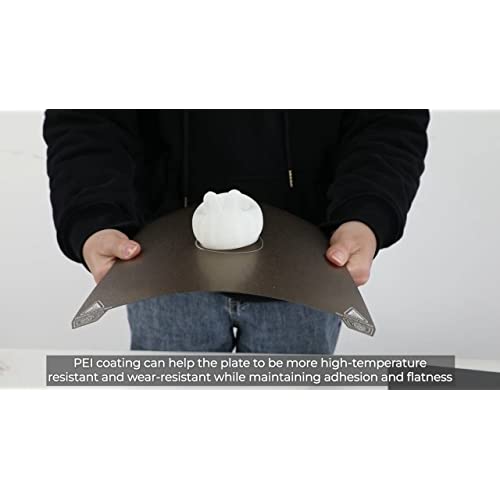
Creality Official PEI Sheet Removable Magnetic Flexible Heated Bed Plate Build Surface Bed Cover for Ender 3 S1/Ender 3 V2/Ender 3 Pro/Ender 5
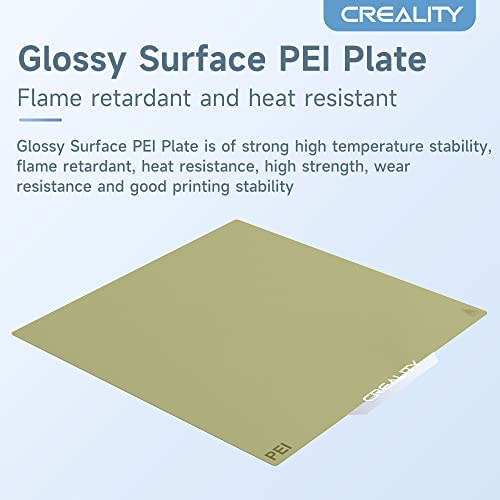
- Easy to adhere to the printing surface, easy to remove the prints, flex slightly to pop your print right off.
- The PEI printing plate surface is smooth that will not leave any marks on the bottom of the prints.
- The PEI sheet can bear the maximum temperature of the nozzle at 200°C, and the hotbed at 70°C.
- Compatible with PLA/ PETG/ PEEK/ ABS and any other filaments.
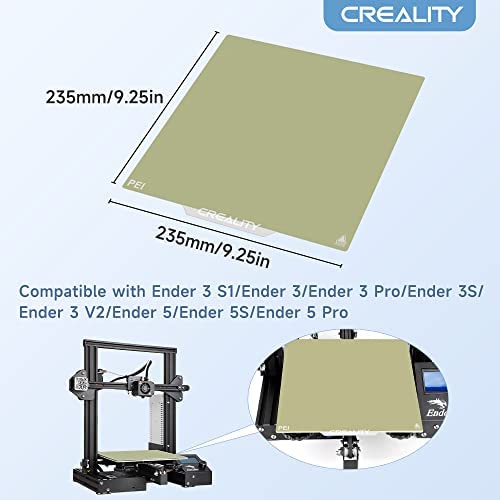
- Compatible for Ender 3/ Ender 3 S1/ Ender 3 v2/ Ender 3 Pro/ Ender 5/ Ender 5 Pro etc.
Specifications
- Product size: 235*235mm (9.25*9.25in)
- Material: Spring steel(PEI surface) + Magnetic rubber
- Product weight: 455g (1lb)
- Product thickness: 20mm (0.78in)


NOTE!
1. Please remove the transparent protective film on the surface before use!
2. Level the bed and set the height of the nozzle before printing! Because it is slightly thinner than other bed.
3. The color may exist a slight difference due to different screen displays.

|

|

|

|

|

|
|
|---|---|---|---|---|---|---|
| Soft Magnetic 235*235mm | Frosted PEI Sheet 320*310mm | Frosted PEI Sheet 235*235mm | Frosted PC Sheet 235*235mm | Double PEI Sheet 235*235mm | Double PEI Sheet 235*235mm | |
| Product Size | 235*235mm | 320*310mm | 235*235mm | 235*235mm | 235*235mm | 235*235mm |
| Surface Technics | Smooth | Frosted | Frosted | Frosted | Smooth & Frosted | Smooth |