
Micro-Swiss All Metal Hotend Kit for Creality CR-10s PRO/CR-10 Max/Ender 3 V2 Neo
-

Richard
> 24 hourAmazing product! Last hotend you’ll ever need
-
Cassidy S
> 24 hourThis product is very well made and is a great replacement for the stock hotend. Extremely reliable hotend!
-
rjb
> 24 hourIt clogs so frequently that I have not been able to finish a single print with it.
-
Tom Taylor
> 24 hourLove mine and wish I would have bought these years ago.
-
Pickles Printing
> 24 hourLooking to upgrade my CR 10s Pro with a hot end kit. Kit was shipped to me with the wrong parts. After an e-mail exchange with MicroSwiss, I had the correct part the next day. Installation took about 30 minutes and I have been printing ever since. I have printed part that took over 2 days with no issues at all. Overall great product and support.
-
Valentina Dangerfield
> 24 hourThis all metal hot end is very easy to install. 5 stars. Could not be happier. This requires no alteration of the software. The only difference that your printer will notice is that this hot end is 3mm shorter then the stock hot-end. On the Ender 3 this is trivial because all you have to do is re-level the bed. The entire point of this hot-end is to eventually complete the upgrades to be able to print at high temperature for Nylon and Polycabonate. If that is not your end goal you should be good with the stock hot-end. I would consider upgrading anyways. This hot end is just beautiful and it is very obvious when you see it in person that it is a high quality piece of machinery and it definitely makes my 3d printer far far sexier. This upgrade alone will NOT allow you to print at high temperatures. In addition to this you will need 1. A glass Bed: other beds like magnetic will lose their magnetism at the required higher temperatures. 2. A k Type thermocouple. If you have an Ender 3 original board you will NOT be able to have a BL Touch and The K Type thermocouple because of a lack of free pins. The K type thermocouple is required to read the higher temperatures. The original temperature sensor is a thermister but this has too high a voltage error at high temperature so a change of technology is required. The K type thermocouple will also require a daughter board (sold separately) to communicate with the Ender 3 stock control board. A new revision for the Ender 3 stock board has come around April 11th 2019 out but I am not too familiar with the changes except the upgrade to non crappy and much more silent stepper drivers. If you want the BL touch and the K type thermocouple youre going to have to upgrade to a board with more pins and memory. I suggest the MKS Type L board and dont forget to buy the stepper drivers which are removable. (list continued) 3. One Meter Capricorn Boden Tubing. The stock Boden Tubing is Teflon and it will vaporize into hazardous airborne toxins when upped to temperatures needed for Nylon and PC. 4. An Enclosure. The constant warm temperature needs to be reached while printing the high temperature materials or they will warp and not print well or have good adhesion. Also it will be helpful if the enclosure is fireproof in case there is any accident. A brief overview of the installation of this part on the Ender 3 is as follows. This does not include the K Type Thermocouple Upgrade. Brief Installation Instructions 1: Remove the two screws that are holding the two fans over the hot-end. This will expose the hot-end. 2: Unscrew the hot-end so it is off the rail. 3: Undo the screw that is holding a metal tube that is the heater. 4: undo the screw that is holding the temperature sensor. 5: The metal tube heater and temperature sensor should now slide out. 6: Put the temperature sensor and heater into the matching holes on the micro swiss hot-end. 7: Unscrew the top of the original hot-end to release the bowden tubing and then pull it out. 8: The old hot-end should now be free and should be stored for a rainy day. 9: Mount the top part of the Microswiss Hot-end the way the old one was. 10: Attach the bottom of the Microswiss Hot-end known as the heat break with the included screw. 11: Shove the Bowden Tube into the MicroSwiss Hot-end until it wont go any Farther. Itll hold with friction alone. 12: Screw on the nozzle loosely. The nozzle is hardened steel good for printing abrasive materials like nylon and glow in the dark materials. 13: Reattach the Fan Enclosure 13: Bring the microswiss up to temperature and finish tightening the hot-end once its hot. Just a bit of pressure is good. 14: Dont Forget to re-level the bed as the new nozzle is 3mm higher than the old one.
-
Roberto
> 24 hourI was worried that this unit might not fit my CR10S Pro because I have installed a 3D printed Fang style print cooling fan/duct assembly. No worries, this hotend was a perfect fit and only took a few minutes to install. I reduced my retraction settings from 8 to 4 and the retraction speed from 80mm/s to 50mm/sec. The first few prints with the new Micro Swiss hotend are as good or better than any print to come off this machine. Im quite happy with this product. I just wish it were a few dollars less expensive.
-
Sheng X
> 24 hourAt first I had issues with the product, they sent me another one. Totally good to go. Highly recommend
-
Allan McClendon
> 24 hourOrdered the wrong hot end due to the reviews saying it fits the ender 3. Now Im stuck with a part I cant use.
-
Joseph h.
> 24 hourWorks perfect I’ll pricey but you won’t have to buy it again


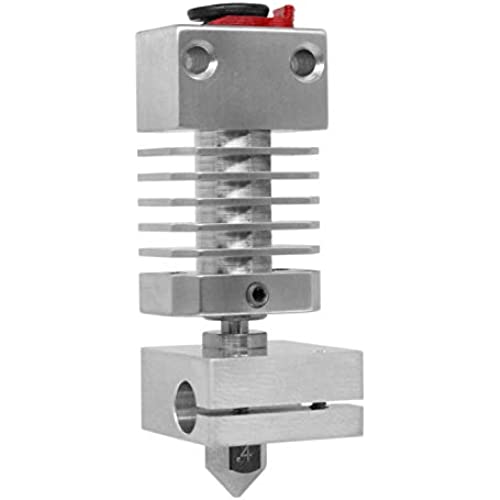
Micro Swiss All Metal Hotend Kit for Creality CR-10s PRO:
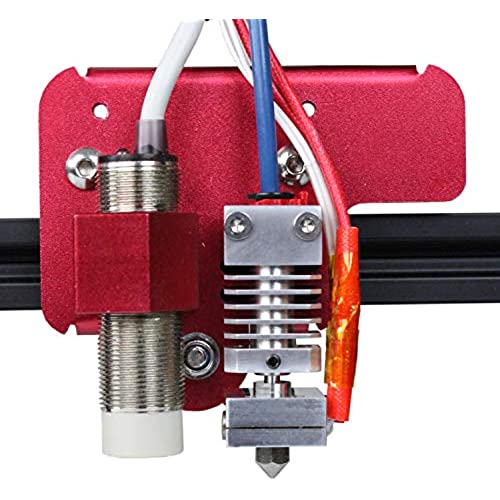
This is a drop in All Metal Conversion kit for the CR-10s Pro printers. It requires absolutely zero modification to your printer to install. Our uniquely designed cooling block eliminates need for a thermal tube. By not having a separate thermal tube inside the cooling block, it allows for faster heat dissipation. The thermal heat break is made from Grade 5 Titanium Alloy to provide excellent thermal isolation between the heater and the cooling block. Titanium is extremely strong material and offers almost 3x lower thermal conductivity than stainless steel, creating more defined meltzone.

Fits:
- Creality CR-10s Pro
- Creality CR-10 Max
- Ender 3 V2 Neo

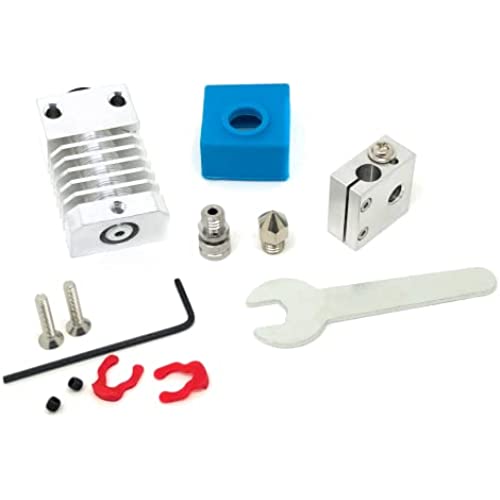
What"s in the box:
- Aluminum Cooling Block
- Grade 5 Titanium Heat Break
- Aluminum Heater Block
- Brass Plated Wear Resistant MK8 .4mm Nozzle
- Silicone Sock
- Hardware kit

|

|

|

|

|

|
|
|---|---|---|---|---|---|---|
| Micro Swiss MK8 Brass Plated .4mm Nozzle | Micro Swiss MK8 Brass Plated .6mm Nozzle | Micro Swiss MK8 Brass Plated .8mm Nozzle | Micro Swiss MK8 A2 Plated .4mm Nozzle | Micro Swiss MK8 A2 Plated .6mm Nozzle | Micro Swiss MK8 A2 Plated .8mm Nozzle | |
| Base Material | Brass | Brass | Brass | A2 Hardened Tool Steel | A2 Hardened Tool Steel | A2 Hardened Tool Steel |
| Plated | ✓ | ✓ | ✓ | ✓ | ✓ | ✓ |