
3D Printer Kit with Aluminum Ender 3 Extruder Upgraded, Compression Die Springs for Bed Leveling, Metal Hand Twist Leveling Nut Suit for Ender 3 Pro/5/5 Pro, CR-10 Series/10V2/20/20 Pro
-

MJ
> 24 hourTLDR: If you indend to go direct drive at some point you should get a dual gear extruder instead of this. Full review: Everything in this kit is useful if you leave your printer as bowden drive. The spring upgrades are nice although I have seen there is now a silicone rubber version which is supposed to be a bit better than the springs. I have not tried those and am happy with the orange springs. The oversize aluminum adjuster wheels are great and better than the smaller plastic ones. The metal extruder works better than the plastic one, however when using in direct drive format it would click because it would let the filament slip through the single gear mechanism. I upgraded it to one of the metal red dual gear extruders instead. I am using the hero me 5 remix of the direct drivinator and it works great on my ender 3.
-
Sakrificer
> 24 hourOnce completely installed, the wheels rub.. so I am going to print a spacer or something to make them work. Just wish I had known a head of time.
-
Jeff C.
> 24 hourI was really pleased with this purchase. These leveling nuts are not a cheap plastic rather, a nice aluminum. The extruder kit is also a nice hard all metal, came with all the mounting pieces, including an extrusion gear and bearing. Overall quality is great and amazing value.
-
Shanester
> 24 hourAll the components in this kit are well made and easy to install. I installed these on the Creality Ender 3 Pro and they are much better than what came with the printer.
-
J. Foust
> 24 hourThese springs are a serious upgrade over the stock Ender 3 Pro springs! I read a lot of notes saying that the stock springs just didnt have enough tension in them, and after every few print jobs I was having to level the bed again. Not the end of the world, but if something will solve that problem for under 20 bucks, and upgrade the extruder to aluminum, why the heck not go for it? Everything arrived quickly and was neatly packaged. After opening the bag with the bed springs and wheels, I was impressed. The springs are very beefy, the wheels are nicely made and have good grippy teeth on them, which will make fine adjustment much easier, plus the pop of red under the printer is a nice touch. Installation was pretty simple: Unscrew the stock adjustment wheels until they come off the screws. Lift the bed up (being careful not to damage the bed heat wires). Remove old springs. Then I set the rear springs in place and put the bed screws down through them to hold them in place, and then tilted front of the bed down and slipped in the front springs. It was a little awkward to get it all lined up, but nothing too bad at all. After that, I attached the fancy new adjustment wheels. I went around the bed, tightening each corner to around 25%, 50%, then 75%, then finally 100% of the way down. I figured I should tighten them up gradually to keep from twisting the bed or knocking anything too far out of whack. Happy with how things looked, I turned on the printer and hit auto-home, and discovered a problem: Home position now had the nozzle below the print bed! I went back and checked the adjustment wheels and they were cranked down as tight as I could get them. I ended up raising the Z-axis about 2mm and that looked better, so I adjusted the Z-axis stop switch up until it clicked against the bed. Then I fired up the printer again and auto-homed it. Much better! I could see I had a gap now. I dont know if it was the upgraded parts, luck, or what, but leveling was much quicker. I leveled all four corners, then checked the center and it was dead on. After that I went back around the corners to check them all. The front left needed a tiny tweak and everything else was dead-on. The aluminum knobs are super grippy and very easy to make tiny adjustments. The stock plastic wheels werent terrible, but there are definitely better. Ive run 3 or 4 prints since doing the upgrade, and after that batch was done, I checked the level again. Still dead on , right where I left it! Hoping that continues, and things stay exactly where I put them. The extruder upgrade is really nice as well. It went on without any hassle, and feels way better than the cheap plastic included with the Ender 3. (just make sure when you remove the old one that you support the motor - the extruder is what holds it in place and when you remove the last screw, its going to drop!) The thing I like most about it is that its silver so its MUCH easier to see the hole past the gears that you have to get the filament into. That was a huge struggle for me with the black plastic, and with the new silver extruder, you can see exactly where the filament is going and it slipped right in with no trouble at all. I will say that the spring that came with the extruder was bigger and harder to compress than the stock one, and I didnt like the feel of it installed, so I used the stock spring and its been great so far.
-
John M Evans
> 24 hourThis is a good upgrade for an Ender 3 V2. Upgrade the Bowden tube, and you are all set!
-
tinyenormous
> 24 hourThese parts are nice upgrades. The leveling nuts are admittedly mostly for bling, but they look nicer than black plastic and they work well. The springs are a good upgrade, and the extruder upgrade is on the top of everyones Must upgrade lists from stock (since the stock plastic one eventually breaks). Getting everything in one order was nice, and it came well packaged.
-
Felipe Ankunding
> 24 hourEverything needed was included, and very easy to install. If you use a glass bed, the Z-axis stop will need to be adjusted up about 3mms
-
Trouble_Man
> 24 hourAlready unimpressed. Just got the package, opened it up and everything looks the part, minus the springs...because theyre not there.
-
Zach L
> 24 hourThe aluminum parts are well made and the upgraded bed leveling wheels are great! I used a little dot of Elmers glue between the bottom of the screw heads and the metal bed plate to keep them from spinning. It didnt stick to the metal super well, but it made enough friction to keep the screws steady.


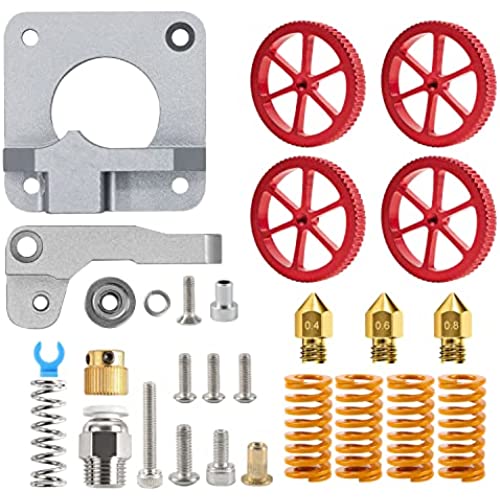
Creality 3D Printer All Metal MK-8 Extruder Feeder Drive, 4PCS Aluminum Hand Twist Leveling Nut with 4PCS Hot Bed Die Springs, and 3PCS MK8 M6 Brass Nozzle.
Installation position of all accessories

It is an update for the printer, and can resolve the under extrusion and uneven platform problem. Through smooth extrusion and controllable printing speed, the printing product has higher operability and stability.
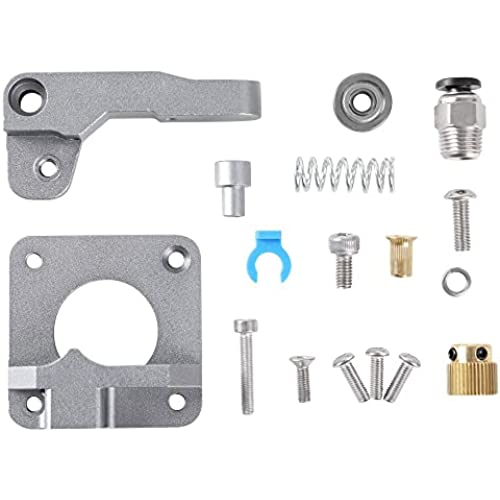
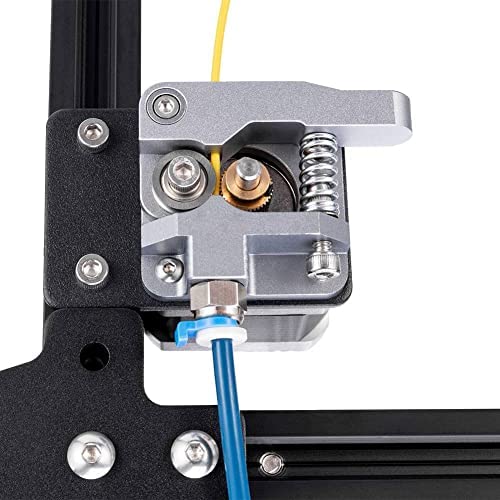
Extruder installation steps

Update for the plastic extruder, and the silver exturder has smoother feeding than the red metal extruder, more stable and durable. Compatible with PLA/ABS/Wood/TPU/PTEG, 40 Teeth drive gear feeds the 1.75mm filament very smoothly. No need to change stepper motors or other mounting hardware.
Extruder part details


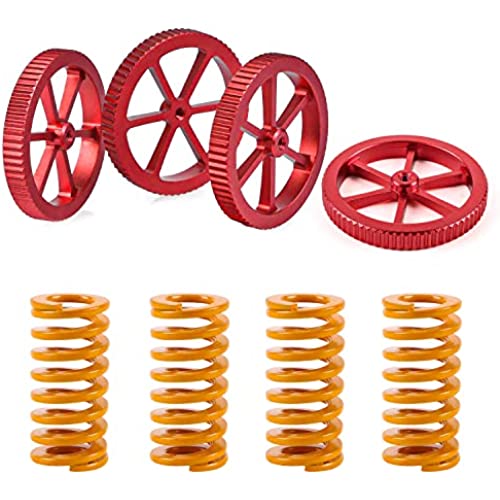
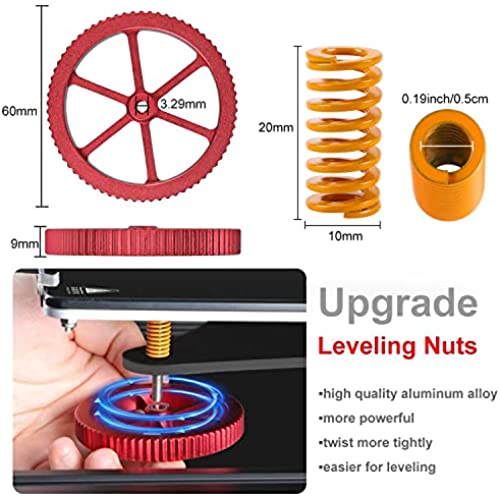
Upgraded Aluminum Hand Twist Level Nut
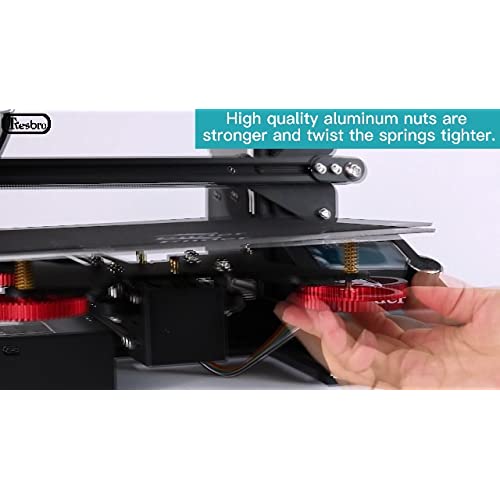
These red aluminum nuts are original upgraded replacement part. Made by high quality aluminum, last over years, much longer than black plastic nuts. Metal nut is more powerful and will twist more tightly than plastic nuts.
The torque of these nuts is large, making it easier to fine tune the hot bed.

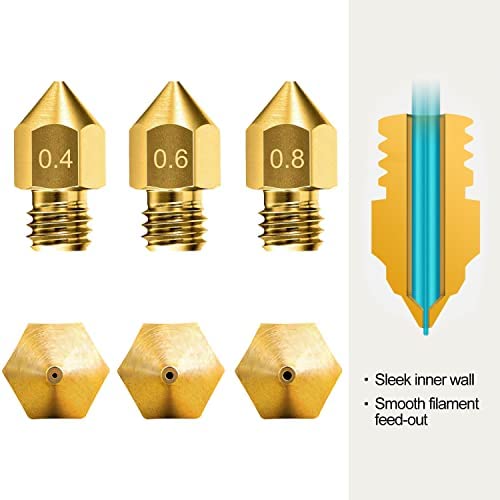
Three mk8 brass nozzles
The diameters of the nozzles are 0.4mm, 0.6mm and 0.8mm, you can choose different diameters to control the printing speed or details. which is of good thermal conductivity and high wear resistance, reducing oxidation reaction under high temperature and getting good prints. Filament Diameter: 1.75mm.
Applicable models

