

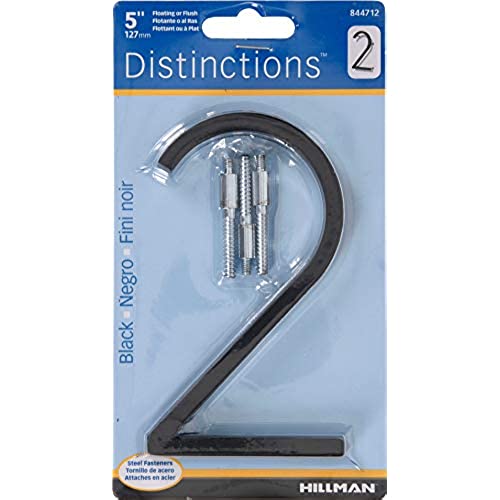
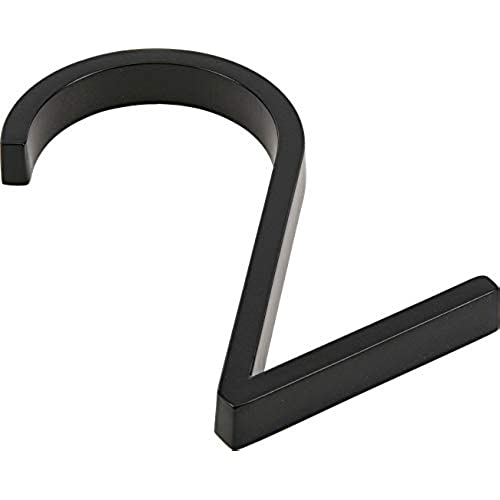


Distinctions 844712 Upgraded 5 Black 5 Floating House Number 2
-

Artist Lynn
> 3 dayMy new house numbers look really good. The instructions didn’t make much sense with 2 different size drill bits. I had a hard time drilling the holes but I finally got the screws in. I wanted flush mount but couldn’t get the holes deep enough so I ended up with offset mount. Oh well. They still look good.
-
Anil
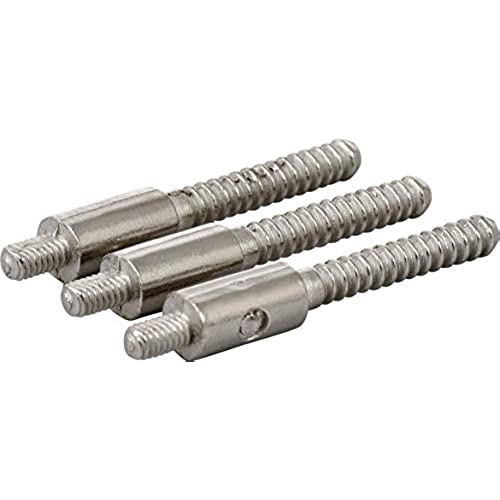
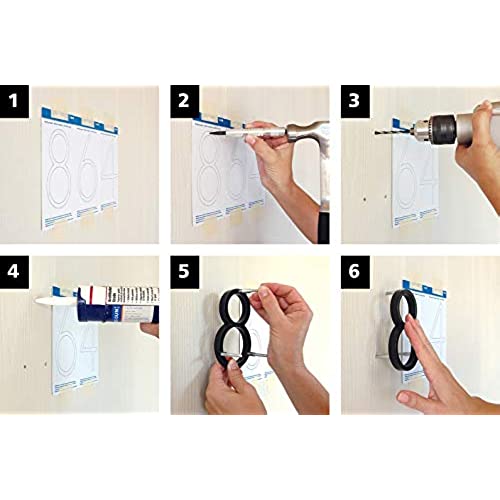
Greater than one weekThe numbers look goos, but the pegs are very poor quality. Of the nine pegs (I bought three numbers) three of them had a noticeable bend. The bend isnt a huge deal, since nobody is going to look at the pegs, but it does mean that you cant use the template. Thats right - dont use the template! 1. First attach the pegs to the numbers (no need to tighten much, as youll likely break them). 2. The use lipstick or something to mark the pegs. My wife wouldnt let me use her lipstick, so I used Nutella! 3. Carefully align the pegs on either the template, or if you know exactly where you want it, right onto the wall. I marked the templated, then taped them to the wall. 4. Now use a center punch on the lipstick or Nutella marks to create a starter hole in the wall. 5. Double check that the pegs align with the center punch holes. 6. Drill the holes. 7. Finally ensure that the numbers fit in the wall without any effort. You cannot break a peg on this step - if it doesnt enter without effort your holes are not aligned. 8. Remove the numbers, fill the holes with clear silicon and put the numbers back in place. Tape them there until the silicon dries. Hope this helps - good luck everyone! Ive attached a few photos to reenforce my main point - do not use the templates!
-
Kirk
> 3 dayLike other say, they look great, but you can’t trust the templates. Looking close I saw that two of the three posts aligned with the templete and the third was slightly off. That slightly was enough to make trouble when mounting though, so drilled only the two holes, then pressed the number with all posted installed into the house to see where the third post left a mark to know where to drill the final hole. Worked just fine. Also sawed the posts much shorter so didn’t have to drill so far into my siding. Such light weight numbers do not need to be mounted nearly that far into the siding. This will help siding and eventual replacement of the numbers. My last numbers where 20 years old and posts snapped off in siding when trying to remove, leaving me to have to grind post below surface before could putty over and paint. These post are cheap cheaper metal, so very likely to snap on removal if mounted their full length.
-
rafael fernandez
> 3 dayThey look great buuut, do yourself a favor and get an 3/16 drill bit and just mount the screws to the numbers. Then get yourself a piece of 1x6 wood and place it over the number and just hit it untill the screws are in all the way. Thr 3/16 hole allows you to push it and fit pretty snug Also double check the 7 because the holes on the template dont line up with the numbers. I only had trouble with the 7
-
My Two Cents
Greater than one weekThese house numbers are very modern and sleek. I choose to use the floating vs flush mounting option. Its very attractive to see the shadows behind the numbers from the sun or porch light. I read the other reviews and two items were fairly constant. 1. The metal mounting studs easily break. 2. The template provided to drill mounting holes do not match the actual position of the metal studs. With that info, I very carefully screwed in the mounting studs for each number until they felt secure but not tight as I was afraid of stripping out or snapping the studs. I prepared my templates as instructed and then took each number with studs attached and lined them up with the template holes. Sure enough each number had a slightly different position from the template. I suspect that the studs are not perfectly straight so each turn of the stud moves them in a different direction in relation to the template holes. I marked each position of the real studs in order to get a proper fit. I followed directions and used a 1/8 drill bit, but stopped before using the final 1/4 drill bit. It just seemed that the 1/4 bit was too large and the same size as the collar of the stud that provided the floating section for each number. I decided to test fit the numbers and frankly it was perfect. Each number fit perfectly and because the holes were only 1/8 they provided some light resistance so that the each number would be held in place without any adhesive as instructed. Also I noticed that the collar was just large enough to hide each hole so it was a very clean look. I pulled out each number so as to wipe down the surface from the dust I created and sure enough two studs snapped off just before the collar. I was dumbfounded as I was pulling straight out and the amount of force was very slight. It looks and feels like metal but behaves like a cheap plastic thats brittle. The good news is that the place it snapped off left just a tiny bit of material so that it can still rest in the holes. I might fix it later but for now it works. I figured I would call Hillman Group to provide some feedback. The customer service person Katie was friendly and appreciated my comments but took no effort to ask for a callback number or email. She seemed disinterested and had no desire to fix the issue with me, even after I told her I would be writing this review. The home page for Hillman Group states Quality, Service and Innovation. Hillman Group has failed on all three.
-
brightnight
> 3 dayIve read a lot of reviews about these over the years and the consensus was that they were cheap and the mounting bolts were crooked and the instructions were bad. This review is written 11/2020 and I can reassure people that those issues are no longer a problem. I ordered 4 numbers...each of them were solidly made, the mounting bolts screwed in easily (do it by hand, of course) and the installation was fairly easy. Go by the instructions in terms of how to install. Earlier reviews said to ignore those instructions but they are more substantial now and the size of the drill bit you need to use is 100% accurate (earlier versions had smaller bolts and said to use 1/8 bit...only use that if you want to drill pilot holes). The proper size of drill bit to use is 5/16 Wiggle it around a bit as you go in and out to give yourself a little room. the 5/16 bit drills a hole that is SNUG but thats what you want with these. I didnt even have to use any kind of adhesive gel/silicone to keep them in. STILL DO NOT USE THE HOLES MARKED ON THE TEMPLATE. As others have suggested, place your number over the template (bolts down on the paper) and mark where those bolts hit with a marker or pen. That way, you know exactly where those bolts will hit for the drill holes. Tape up your templates with a level and ruler so they are even and straight, then use your punch to hammer in the marks where your bolts hit on the template. Give it a good pop for each one and then take the numbers down. Drill your holes and give it a little action as the drill goes in and as it goes out. Youll find that the fit is still tight but accurate. At that point, I went from one number to the next, just getting the bolts in place with the holes and then tapped them each in by putting a cloth over each number and using a rubber mallet to tap each bolt area of each number. Voila. Quick and easy and accurate. Took me about 15 minutes to install 4 numbers and again, I didnt need to use any epoxy or silicone to keep them in. Theyre snug and solid (I installed into wood so if youre going into masonry or brick, make sure youre using a masonry bit. The rubber mallet is the secret weapon here...you can get some pressure on the installation process without damaging the numbers or bending them. Just be sure to cover them with a wash cloth or something so you dont leave any marks. Overall very happy with these and the process itself. Even a novice could do it. Just take your time marking the templates with the bolts, take your time getting the templates level and the numbers spaced properly and youll be good to go.
-
Kristin Appelhans
> 3 dayCan you even tell which one is the old model from my picture? Yeah me neither. Which is great because I was hoping my mismatched upgraded and old model numbers would all look the same!
-
Jeanne
> 3 dayI thought these numbers were so easy to install! I taped the templates together, so spacing was simple. I used the drill bits listed in the instructions. We used a rubber mallet and a towel to get them into place. I just bought another set for the back of the house!
-
Kelly K.
> 3 dayGreat house numbers - Took us less than a half-hour to install all. They look great, have super readability.
-
Mike
> 3 dayTurned out nice. However, a couple of the pins wouldnt twist in and I ended up snapping them trying to use a pliers to twist them in. Luckily they were on numbers that had three pins so it didnt cause issues when hanging them.
