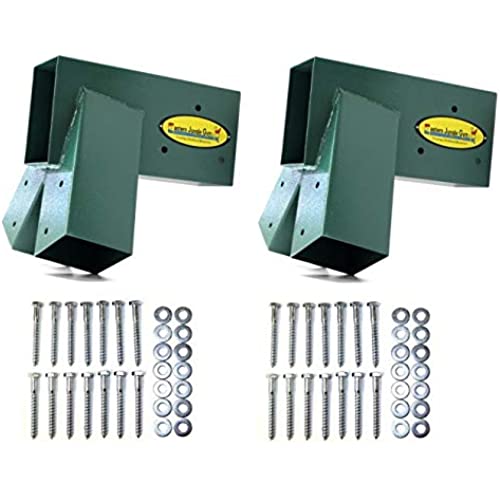
Eastern Jungle Gym Easy 1-2-3 A-Frame 2 Brackets for Swing Set with All Mounting Hardware, Green
-
Mmorty
> 3 dayHad to sand 4x6x12 down to fit brackets, but overall, a good product.
-
The Bahn Burner
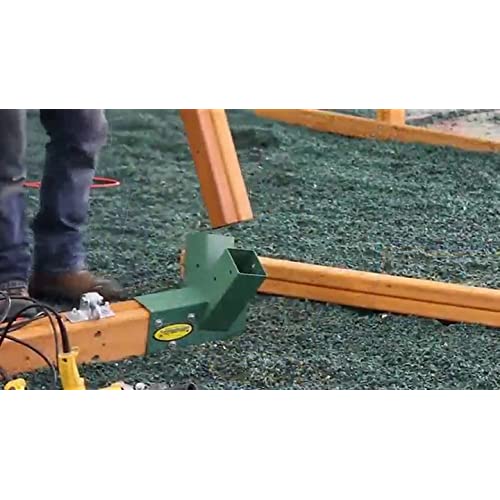
> 3 dayProduct is perfect for building a back yard swing set. I built it during the pandemic of 2020 as all the local playgrounds were off limits. The kids absolutely love it and play on it everyday now. The joints and wood beams took about an hour from start to finish to install. I used pressure treated wood from a local lumber yard here in the Northeast. I used (4) 10 foot 4x4 beams, and (1) 10 foot 4x6 beam. The 4x4 beams fit perfectly in the brackets, but the 4x6 beam needed a lot of wood shaved off. The wood was not wet and I stored it in my garage for over a week prior to installation. To make the 4x6 fit, I used a standard block planer and removed at least 1/8 of an inch off of each side of each end. Even so, I still had to used a block of wood with a shock-proof rubber mallet to seat the joints all the way in. After that, everything else was a breeze to install. Some have said the included zinc coated lag bolts are incorrect for pressure treated wood (true), but the lag bolts supplied with my kit were indeed galvanized, and definitely not zinc coated. The other notable tip for building this kit is to have a lot of help for installing the 4x4 legs, as well as a step ladder. Four helpers is ideal, but two sturdy adults can make it work. For installation, first install the joints onto the 4x6 beam, then a 4x4 beam on each opposing joint with it laying down. Bolt them in securely, then grab your help for lifting the three attached beams and hold them upright. For the other two opposing beams, have your helpers slowly tilt the assembly towards the angle that it will attach to the other 4x4 beams. Install the last two 4x4 beams and bolt in place. I was able to comfortably put two swings (one standard and one bucket), and one trapeze bar, with 15 spacing between each swing. The swing seats I used recommended 18-22 spacing between each chain, so I did 20 for both, and the trapeze bar was 18 of spacing.
-
Sarah McUmber-House
> 3 dayThese framing brackets made building our grandchild a sturdy swingset amazingly easy. They are heavy, strong, and easy to fit (after a little adjustment with a hammer and board scrap to flatten a couple of shallow dents, Quality Control might want to pay more attention to that). We used one 4x6x12 and 4 4x4x10s for a nice wide, and tall framework. That height is perfect for the double saddle swing height, and an adult height sling swing. We added extra chain to lower one of the sling swings, and the platform swing to small person height. It is popular! And strong enough for an adult or two to enjoy some playground memories. Suggestions: - Be sure to leave *at least* 12 between swings. - Install all of your swing anchors *before* you assemble the frame. - Make sure at least one end of each of your timbers will fit cleanly and snugly into the brackets, and mark it so you dont have to guess before assembling. (We used a flapwheel sanding disk on the angle grinder to adjust the ends of the top span, and one leg.) - We also used the angle grinder with sanding disk to rounding the corners a bit, all down the length of all four legs. (safer if a child happens to run into it) - Do make sure that you only drill your pilot holes half the depth of the lag screws, so they will tighten down well. - Have at least a couple of strong adult friends help to stand it up. - After erecting, move the bottom of each of the legs out to its far corner till it stops (there will be a little play, and you want to minimize that). - Check that there is no movement, by leaning/pushing on the legs in all directions. - Hang those swings, and call in the kids! (you may want to take a turn on it first, after all, you earned it).
-
Leonard Goodwin
> 3 dayThis is a great product. The treated 4x6s I purchased was a little tight.
-
bobcat
> 3 dayThis product works great, appears to have a good coating and came with hot dipped galvanized lag screws to prevent rust when used on treated lumber. I had read reviews from people who couldnt slide this onto cedar lumber. That is because cedar comes in full 4x4 dimension, whereas treated lumber is called 4x4, but is actually 3.5x3.5 nominal dimension.
-
Heather
> 3 dayBad news: - As others have mentioned, I had to rip just over a blade worth from my 4x6. Kinda difficult ripping a 4x6x12 by yourself? And even after ripping a blade width from the height of the beam and drilling out their rivets to get rid of the manufacturers tag (rivets protrude into the inside side wall which too hungs up), I still had to beat it with a rubber mallet for four feet for the middle bracket. Spent a lot of extra time trying to make these brackets work. Good and bad news: - They seem to be reading these reviews and improving their product which is why I gave them four instead of three stars. I read a review showing no paint on the inside of the bracket and mentioning concern of the pressure treated wood rusting out the bracket from the inside out. Well thanks for writing that review because they must have listened, mine is painted. The same review mentioned the wrong lags are included. Well once again, they must have listened. One of two I purchased had galvanised lags. I wish they both came with galvanised lags. I assume I got one older bracket that was sitting on a shelf for awhile and the other more recently made reflecting this change. Suggestion for the manufacturer: If you make these brackets a little bit bigger, you will get better reviews and sell more product. If I could have just slipped them on the 4x6 and screwed in place, then I would have given you five stars. I would rather them be a bit loose then have to rip a beam. The whole reason I bought these brackets is to save time. One little change and then I would say that you would be silly to build a swingset without one of these brackets.
-
Pamela Audeen Poddany
> 3 dayEASTERN JUNGLE GYM EASY 1-2-3 SWING SET A-FRAME BRACKETS These sturdy and heavy-duty brackets are the only way to build a home swing set that will be extremely sturdy. The brackets, while costly, are made of heavy gauge steel, 100% welded joints, and painted nicely to stay rust free for a good looking swing set for years to come. The lag screws and washers are not included. You can purchase the bolt kit extra or go to a home center just as easily. The brackets eliminate any cutting -- you simply buy the wood -- I purchased a ten foot 4x6 beam and ten foot 4x4 posts. Using ten foot 4x4 post in the brackets makes the swing set nine feet high. I then put each leg in the ground 12 deep with concrete. The end result is an eight foot high swing set that isnt going anywhere! I installed two swings to give the kids plenty of room to have fun and swing to their hearts content. In the future when the kids have outgrown this, we will hang a porch swing. Some sanding with a belt sander was required to slide the wood into the brackets. Pressure treated lumber tends to swell and would probably fit better if it sat in the sun for several days to dry out. Each bracket requires 14 lag screws and washers to fasten the wood. This is easy once you drill pilot holes. I used an impact driver to drive the screws and that worked very well, quickly, and was easy. I also purchased 3/8x6 eye bolts to hang the swings. I suggest you get some friends to help stand the swing set up once you have it together. Overall this swing set is built like a rock and it doesnt budge one inch when the kiddies are swinging. Its much sturdier than a home center type you would purchase. Our grand babies LOVE it!!! You will find cheaper brackets out there but you wont end up with the quality such as these. I did everything top shelf on this project and these brackets definitely fall into that category. My total project cost was about $325.00 but this swing set is like one you would find on a playground and is built to last.
-
James
> 3 dayI have assembled two of these swing sets now one at our home 12ft wide with 3 swings and one at my 87 year old grandmothers house 16ft wide with middle support bracket, a bench swing for her and 2 kids swings. First I will address some complaints in other reviews about brackets being too small for a 4x6 PT beam. Yes the beam fits tight and that is how it should be. Due to the process, and its all in the name pressure treated, they force chemicals into the wood with pressure to preserve it. Youll notice over time even on your deck the deck boards you fit together snug will shrink as they dry out and leave you ⅛-³/¹⁶ gaps if you buy your lumber the same day and expect to slap it together its gunna fight you. That said there are a few tricks you can try. Light coat of vegetable oil or as long as the wood is fairly dry try cornstarch. Then use a wooden block and a sturdy hammer. Best case would be buy the lumber and give it a couple weeks in a sunny spot. You want a snug fit it will be sturdier and movement will affect the hardware and brackets much less over time. Otherwise drill pilot holes for the lags. Build it on a set of saw horses and it will be far easier to tip it up once you are done. Buy sturdy swing hangers or have some made at a local metal shop. No need to cut legs to the angle of the ground they will sink into the grass somewhat and give a sturdy footprint. Also due to covid supply issues you may want to source the lumber prior to ordering the brackets. When it came time to built my grandmas swing set treated lumber was all but impossible to come by. Had to drive 50 miles to find 4x4x8 for legs.
-
Brian H.
> 3 dayAs many other reviewers have noted, these brackets are very tight fitting on a 4”x6” cross beam. I took the brackets with me to a wood yard and I recommend you do the same. The yard I went to had a new bundle of 12’ 4”x6”s. I sorted through about 10 before I found 2 that the brackets would slip over both ends tightly. The other 4”x6”s would have had to be planed down 1/8”-1/4” to get the brackets to fit. The beams from the yard I was purchasing from were ‘Yellow Wood’, so that shows you what variations in dimensions you could get from a random 4”x6” from the supply store. The brackets have all of the hardware needed to affix to posts and cross beams. There were no issues with any 4”x4” posts fitting. Even though I made sure the brackets would slide over the ends of the 4”x6” cross beams, I still had to use a block of wood and hammer to get them to slide all the way on. I drove them all the way flush to the ends of the beam. If you wanted a 3’-4’ overhang, it would be difficult to get the brackets to slide that far without planing down your cross beam. I made a 24’ swing, so I used these brackets on both ends and a middle support bracket to join the 12’ Cross beams. The middle support bracket seemed to be a little larger than these brackets and went on both ends of the cross beams with relative ease. I installed hardware to hang 3 swings on each 12’ Beam. This allowed for 22” from cross beam end to the first swing and 20” center to center for each swing hanger and 20” between each swing. This is very spacious for my girls (10 and 7) and the 20” spacing also allows ample room for adults to swing. You could certainly fit 4 swings on a 12’ Beam if you needed too. With the 4”x4” posts angled out on the end brackets, you could get by with starting your first swing hanger at around 14” from the end of the beam and be fine. I used 12’ 4”x4” posts to allow the girls to swing higher. I also used a 2”x6” brace on each set of 4”x4” posts. I did not trim the ends of the posts where they join the dirt and I have not anchored my swing set. I tested it out by swinging as high as I could and this set does not move at all. I may bury 4 posts on each end of the swing set and screw the ends of the 4”x4”s too just to be safe as the girls get older and wilder. I attempted to stain and waterproof my wood before putting it up, but it was just too green to hold the stain. I’ll come back and do that in a couple of months. I did have the luxury of using a front end loader to hold the cross beam in the air while I stood the 4”x4” posts up and into the brackets. Most slid right in and tight. If they didn’t, I got on ladder and rocked the cross beam while pulling down and they easily slid the rest of the way down on the 4”x4” posts.
-
Robert LaCombe
> 3 dayBrackets are great. Hardware seems fairly cheap.