

Steadyrack Bike Rack - Wall Mounted Bike Storage Solution
-

Appy Balboa
> 3 dayI bought 2 for MTB and 1 for road bike. I spent way too much time trying to determine if I want these up high, level across the top, bottom, down low, etc..... Anyway, I settled on up high. These are easy to lift the bikes into, as well. Dont hesitate like me. If you think you may want to put them up high and youre having doubts about how difficult it will be to use, dont doubt yourself. Do it.....
-
Grizzly
Greater than one weekI bought two of the Classic versions. Wall stands are a great space saver, but my wife and kids always found the type that hooks around the front wheel difficult to use - so they ended up never using them. The steady rack was easy to install (just follow the instructions to get the right mounting height depending on your bike size). Our bikes were typical road bikes with 27 tires and the top bolt height for the rack was 67 off of the floor. The front wheel rolls right into the stand (no lifting needed) and once in the stand the back wheel rests against the wall mount (approximately 1 off the the floor). The stand holds the bike upright and straight, so there is no risk of the bike falling to one side if the front wheel gets turned or bumped. I plan to get 4 more for the kids mountain bikes/beach cruisers.
-
rose_macaron
Greater than one weekMeasuring the height is somewhat tedious, but ice you have the position, the rest of the installation isn’t too bad. I love how much space these save. Because they swing easily they are easy to put up and down if you mount it at the ideal height for the bike you plan on storing there. Without this I couldn’t reasonably store my bike in my apartment. Definitely be sure to follow the instructions and only install in studs. I had no issues with installation and it’s very sturdy, but a heavy bike held up by drywall would be a bad day.
-
Noah
> 3 dayThe racks seem to work well and are secure into the wall. Quality: my only main issue is that the plastic caps covering the bolts area on the top and bottom are very cheap and don’t come off or attack easily. Otherwise the rack is fairly solid. Install: The one issue I had was that the bolts did not fit the 1/2 inch socket bit. In fact, they were between sizes, which is fine if you just use a large socket to drive them into the wall. Not so fine if you want to take them out without having to use a wrench. The bolts got a bit stripped in the process. I didn’t predrill my holes into the studs, because I was able to just hand drill the bolts in a quarter inch and then drill them the rest of the way. Always predrill a smaller hole than the instructions FYI.
-
Logical Thinking
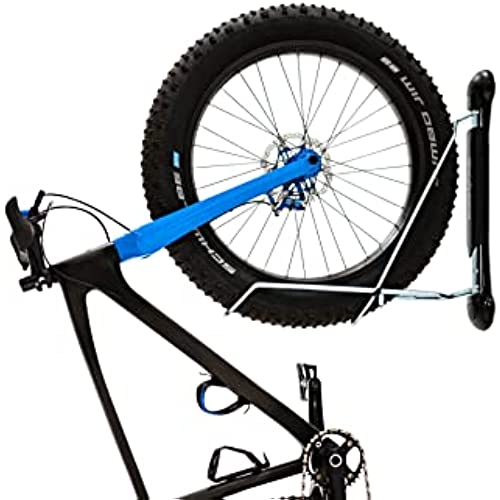
> 3 dayMounted mine next to my storage room door, tilt it in the front of my door out of the rain then If I need to go in I just move it to the right. Don’t think it was meant for the fat 29inch wheels but all I did was bend them open a little more to fit around the tire. Only issue is the bottom piece. I had to use a strap to hold the bottom tire to the mount so I can fully rotate it without the tire falling but other than that it worked perfect.
-
Nancy T.
> 3 dayWhile planning for a garage renovation that took our house from a 1-car garage to a 2-car garage, we wanted to ensure we would be able to store our familys bikes in an efficient manner, but also make it easier for everybody to retrieve them when they wanted to take a ride. The renovation is almost at an end, and you can see the results... these racks are kind of magical in the way they accomplish both these goals at the same time. Im going to provide some key measurements that helped us with planning and installation. We have staggered the racks in order to space them as close together as possible, which is approximately 13-13/16 apart. (Instructions are in mm rather than inches; hopefully this helps others using the English system of measurement.) We hung the first rack 16 from the wall, so that when the rack is perpendicular to the wall for loading/unloading theres enough room for handlebars as well as the riders hands. I wouldnt put the racks closer to a corner than that, personally. There are lots of different answers online to the question of how much space is saved by swiveling the bikes as close to the wall as possible... obviously everyones bike has different dimensions so this is a tough one to answer. In our case, the bikes are approximately 44 high, measured from the ground to the top of the handlebars. When swiveled against the wall (as shown), they stick out about 30 from the wall. Granted, if you were mounting them with a more conventional rack, youd only have the width of the bike sticking out from the wall, and many bikes are 24 wide (from handlebar to handlebar). On the other hand, if you were using a conventional rack youd only be able to mount two bikes (one on top of the other) in the space Ive used for four. Plus I can guarantee that the kids would not be able to quickly take a ride without Mom or Dads help getting the bike down. This is so much better! One last measurement that greatly affected how we installed the racks: When you swivel the bike to the side, youll need at least an additional 3 (added to the bikes height) of room from left to right. This takes into account how the rack swivels from the very base of your front tire, which is not tight to the wall but protrudes slightly when the bike is mounted on the rack. In our case, the new garage space we claimed is set back from the old garage wall. I had hoped to squeeze the bikes precisely into this new space (in a different configuration, swiveling left rather than right), but those extra inches meant that the racks had to be hung as shown. They spill over a bit into the old space, but it works well especially when you consider that our youngest daughters bike will eventually be replaced with a larger one as she grows. This leaves room for that growth -- always a good thing! In the end, weve got 4 bikes in approximately 8 of width, and even our youngest can load and unload her own bike. Consider us VERY happy customers. Oh! One last note on installation: As you can see, weve installed our racks into concrete block. Drilling for and installing anchors into masonry is never easy, but since the rack is made in Australia you should be prepared to either suffer through the arduous task of hand-tightening bolts with an adjustable wrench (as I did) or get some metric-sized bolt drivers.
-
cramitsucko
> 3 dayInstalls super easy, does the job I need them to do flawlessly. Super bomber build quality. This is my favorite bike storage solution I’ve used this far in my lifetime of cycling. Can’t recommend these racks enough.
-
Michelle Alterio
> 3 dayI found these not so easy to install but I had to deal with thin condo walls and a stud that was not easy to find. Overall this product is very good. After searching for something to get my bike off the floor in my condo and swing out of the way when my second bedroom Murphy bed needed to be used I was so happy to find this product. The hardware is very sturdy. The plastic caps are strong. It works perfectly. I did wish the swing out of the way allowed the tire to be in a grub on left and right side @ - their solution is to float the tire on the left or right side of the bottom cap. But it does work great. I give it a overall 5 as its my fault the install was hard. Online video instructions helped a lot.
-
Monique M
> 3 dayBought these after doing lots of research. When I finally decided I wanted the bicycles off the floor with easy access, I decided on this brand primarily for ease of use and ability to swing the bicycles 90 degrees either side to minimize the protrusion into the garage space, which is being used for a car detailing business, a workshop, and an exercise area. I decided not to mount the racks directly on the 16OC studs because I wanted the bikes spaced about 12OC apart to maximize wall space. I spent more time planning and measuring than my husband and I spent installing the back boards and racks. I created templates and taped them to the wall to arrange how the back boards and racks would be mounted (see picture.) Then I cut and attached the back boards (2×4s) for each bike, which were all approximately the same size. I staggered the height of the racks so that the handle bars would clear each other and allow the bike to be mounted closer. I am very pleased with this purchase, and would purchase more if needed. I highly recommend! Oh and our 23 yo son said they were cool.
-
Bunny Buddy
Greater than one weekThis is the best solution for bike storage. It is sturdy and securely holds the bikes even without the lower back tire cup/guide. It was easy to install and is simple to use. Total bonus that they hinge such that 2 bikes can nestle closer taking up less space. The bikes also arent quite vertical as the wall is not uniform in thickness: thicker foundation wall at the bottom with frame/drywall above it. It still is secure. Our garage is pretty tight, and I have no concerns of a bike falling on the car parked nearby even if jostled or bumped.


