

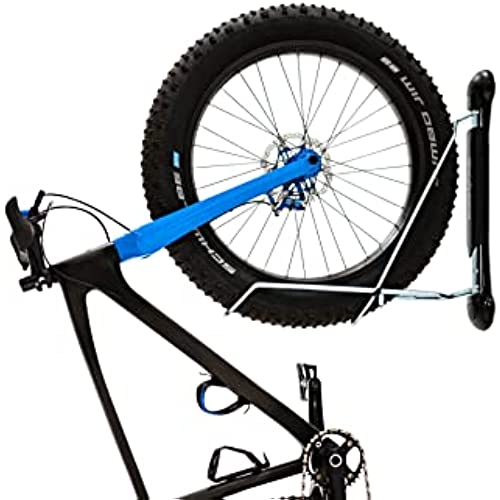
Steadyrack Bike Rack - Wall Mounted Bike Storage Solution
-

Bryan G
> 3 dayVery well made, came with very heavy duty bolts...not sure that is needed unless your bike is made of lead..having said that...rather have too study than too flimsy. Getting the height right is a tad tricky...rear tire must be off the ground...but... not that hard... I mounted to wooden post in my garage, and it works outstanding!! I do wish you could lock it into place...as it does tend to move a bit when loading..but that is minor. Overall, really happy with it, does what I want...although I dont smile when loading my bike like in their videos... :-)
-
Zachary Gorres
> 3 dayI looked into MANY other bike racks before I purchased the Steadyracks. These were the only ones I found that swivel and help save space and make it very easy to access the bikes. I needed something like this because my shed is 10 wide and my service door is directly in the middle (see picture). If I had a stationary rack the bikes would have stuck out into the middle of the doorway. I could have opted for something that I could hang the bikes on the wall above each other, but then I would have to pick up the entire bike and hoist it up 4 to get above the bike on the floor level, which is fine for me but not the other people in the household. Plus, I dont have enough wallspace to do that for four bikes. The Steadyrack solved all of my problems and make it super easy to access each bike by just swinging them a little to access the bike I need. (PS, please dont judge me by the messyness of my shed, LOL)
-
Paula McCabe
> 3 dayWorks exactly like it’s supposed to. The brainwork for installing it isn’t quite as simple as it would seem;, be careful to see that the wheel trough on the rack is in the correct position in the mock up for mounting hole placement which is actually done with the rack on the floor and bike backed up to wall (then you measure from the leading edge of the front tire to the wall with the rear tire abutting it)). Accounting for the projection of a base molding from the wall also can be tricky (I subtracted the depth of the base molding without realizing the base molding didn’t matter because it didn’t hit the tire). I looked at a lot of devices for hanging bikes with a top priority bod not having to lift the bike; one was basically an arm anchored in the ceiling that used pneumatics to lift the bike flat against the ceiling but, there was some fiddling with securing it and I didn’t want a big clutter hanging overhead in my nice-looking garage, which goes for all the pulley contraptions too. I liked Steadyrack’s vertical mount too because it leaves more useable wall space, it’s clean look and after getting used to it, the ease of getting the bike into it.
-
Nancy T.
> 3 dayWhile planning for a garage renovation that took our house from a 1-car garage to a 2-car garage, we wanted to ensure we would be able to store our familys bikes in an efficient manner, but also make it easier for everybody to retrieve them when they wanted to take a ride. The renovation is almost at an end, and you can see the results... these racks are kind of magical in the way they accomplish both these goals at the same time. Im going to provide some key measurements that helped us with planning and installation. We have staggered the racks in order to space them as close together as possible, which is approximately 13-13/16 apart. (Instructions are in mm rather than inches; hopefully this helps others using the English system of measurement.) We hung the first rack 16 from the wall, so that when the rack is perpendicular to the wall for loading/unloading theres enough room for handlebars as well as the riders hands. I wouldnt put the racks closer to a corner than that, personally. There are lots of different answers online to the question of how much space is saved by swiveling the bikes as close to the wall as possible... obviously everyones bike has different dimensions so this is a tough one to answer. In our case, the bikes are approximately 44 high, measured from the ground to the top of the handlebars. When swiveled against the wall (as shown), they stick out about 30 from the wall. Granted, if you were mounting them with a more conventional rack, youd only have the width of the bike sticking out from the wall, and many bikes are 24 wide (from handlebar to handlebar). On the other hand, if you were using a conventional rack youd only be able to mount two bikes (one on top of the other) in the space Ive used for four. Plus I can guarantee that the kids would not be able to quickly take a ride without Mom or Dads help getting the bike down. This is so much better! One last measurement that greatly affected how we installed the racks: When you swivel the bike to the side, youll need at least an additional 3 (added to the bikes height) of room from left to right. This takes into account how the rack swivels from the very base of your front tire, which is not tight to the wall but protrudes slightly when the bike is mounted on the rack. In our case, the new garage space we claimed is set back from the old garage wall. I had hoped to squeeze the bikes precisely into this new space (in a different configuration, swiveling left rather than right), but those extra inches meant that the racks had to be hung as shown. They spill over a bit into the old space, but it works well especially when you consider that our youngest daughters bike will eventually be replaced with a larger one as she grows. This leaves room for that growth -- always a good thing! In the end, weve got 4 bikes in approximately 8 of width, and even our youngest can load and unload her own bike. Consider us VERY happy customers. Oh! One last note on installation: As you can see, weve installed our racks into concrete block. Drilling for and installing anchors into masonry is never easy, but since the rack is made in Australia you should be prepared to either suffer through the arduous task of hand-tightening bolts with an adjustable wrench (as I did) or get some metric-sized bolt drivers.
-
TomK1
> 3 daySo I have 5 bikes that I want to fit into a space 78 inches wide, and about 9 feet tall. Ive been looking at all types of racks for over a year, and almost none of them will work for many reasons. Steadyrack is the only thing Ive found that will do the job. The primary feature that lets you pack bikes in tightly is the entire system allows the bike to pivot so it does not have to be perpendicular (90 degrees) to the wall. The instructions are minimal. I recommend going on YouTube for the manufacturers installation video. In the pack you are provided 4 lag bolts for installing in studs, and 4 companion anchors if you are installing into masonry. The hardest part is planning your installation. In a limited space, I can almost guarantee you will not find a stud where you want to put at least one of the bikes. Rather than try to gin up some sort of board that bolt into the studs, which is messy and will look terrible, go to your hardware store and use expandable metal anchors, which will hold up to 80 pounds each. You put four of them in the wall to fasten the Steadyrack, and it will more than hold the rack & bike, especially since the Steadyrack is only rated for up to 110 pounds. The rack itself is attractive, it folds up when youre not using it, the beak-like lip in front catches the wheel and lets you push it easily into the rack, and the front wheel is locked in. So how did I get 5 bikes on the wall in such a tight space? Put the widest, tallest bike in the center of the wall, about 2 inches off the ground. Put a bike on either side as wide as you can fit, and raise them 3 inches up, that way the handlebars clear each other. Then the two last bikes are between the center bike and the adjacent bikes, placed about 30 inches off the ground. To get higher bikes in and out, you pivot the lower bikes out of the way.
-
J. Keever
> 3 dayIt came out of the box covered in what looked like mold but was actually corrosion. Since it doesnt affect the structural integrity of the rack, I went ahead and installed it. It wont be exposed to rain, since its inside the garage. It was easy to install, and with bum rotator cuffs its much easier to put the bike on this rack than on the ceiling hooks Ive been using. I suppose if someone was concerned about the corrosion they could use steel wool to polish the rack, but hey, its in the garage for petes sake. Not like its in the living room.
-
CyberShopper
> 3 dayI have been looking for a bike rack that can support my wifes new e-bike and help save space in the garage. My wife and I stumbled upon this rack during a recent trip and we bought two for our bikes (we have three). After installing the two we bought (the store only had two in stock) we were so pleased we decided to buy the third on Amazon. We now have all three bikes hanging in the garage in the space that one bike would take up. Super easy to install, saves space and is easy to load and unload the bikes; even the heavier e-bike. I highly recommend this rack.
-
3kids&crazy
Greater than one weekThis is a great product. Our family of five has a variety of bikes, three childrens & two adult - in different sizes. I looked at several systems and read reviews (noted that children had difficulty hooking bike tires, between spokes & balancing, etc), ultimately deciding to spend way more than I had planned on the Steadyrack. It was a slam-dunk. Steadyrack does not disappoint. This product is all that is cracked up to be and in my opinion, worth the money. I bought a four-pack for my family, and an additional fender-style for my retro bike. The area where all bikes are hanging is 71 wide. It holds three mountain bikes, my huge & heavy beach cruiser, and a childs 20 bike. I spaced them approximately 13-15 apart from one another. There would be no way to catch a stud for all these bike racks, so I had the lumberyard cut a piece of plywood to size, and mounted a ledger-board to the wall. Then I had a solid surface attached to the studs. This allowed me to install the racks with more confidence that they would be secure. Im in the United States & believe that the origin of this product is Australia. This may explain why the installation instructions are in millimeters. It was easy enough to find a conversion online, but I did have to be cautious not to make a calculation error. Measure twice, drill once! The only other note, was that in my haste - and without giving it much thought - I used the wrong fastener to hang the first rack. The racks come with both lag bolts & truss-head wood screws, which I dumped out on the workbench, and by the time went to hang the first rack, my son handed me the screw and it stripped going in - quite easily. Oops! I should have known better - so Im mentioning it for those who do not know better. The rack should be installed with the hex headed lag bolt. (Google it, if youre unsure what that is). The guidelines were easy to follow & logical. As for hanging the bikes, its as easy as it seems. My youngest is about 54 tall & 50#. Getting the bike up into position was a challenge for a couple of days. We tried different ways to hold the hand brake & use the seat to leverage on her thigh - and soon enough she was able to do it easily. I attached a photo showing all five bikes on the wall. They do rotate easily out of the way and dont fumble into each other as bikes are placed on & off. I felt like I pushed the limit on how close you would want to hang bikes of this size - and there is still plenty of room to get them on & off without interfering with other bikes. I have a lot of confidence in the longevity of this product. Its rock solid.
-
rb
> 3 dayI dont usually bother leaving reviews, but I really appreciate good engineering. Weve been trying for years to find a decent bike storage solution. We got 4 racks and mounted on every other stud in the garage. Directions were clear. The only thing missing was drill bit size (1/4 if youre going into a stud). The first one took about 40 minutes to figure out. the rest took about 10 minutes apiece. Its easy to lift bikes on and off the lift, and the mount feels very sturdy. Bikes are off the floor and for the first time in a decade I can walk to the garage door without tripping. Happy customer.
-
Bertrand White
> 3 dayI purchased two of these racks to hang my Specialized road bikes vertically on the interior wall of my spare bedroom. Installation was straight forward and once youve located the studs in the wall (highly recommend mounting to studs and not using the expansion anchors) the installation is very easy. The only criticism I would have is that the installation instructions are pretty lacking for people who dont have a lot of experience in handy work. If you dont have experience with similar installations, Id recommend getting a friend to help or hiring a professional. Aside from locating studs, youll want to be sure to avoid plumbing and electrical utilities in the wall. Once installed, the racks worked great! Unlike many other wall mounting methods, Im not worried about improperly installing the bike and potentially messing up the spokes or having the bike come crashing down. Mounting the bike on the racks is super easy, and my petite 5-0 girlfriend has no issues getting her bike into the rack. The rack is incredibly solid and I have no concerns of their quality. I would definitely recommend these racks to a friend. In fact, I have a friend that Ill be installing these racks for in her garage.