
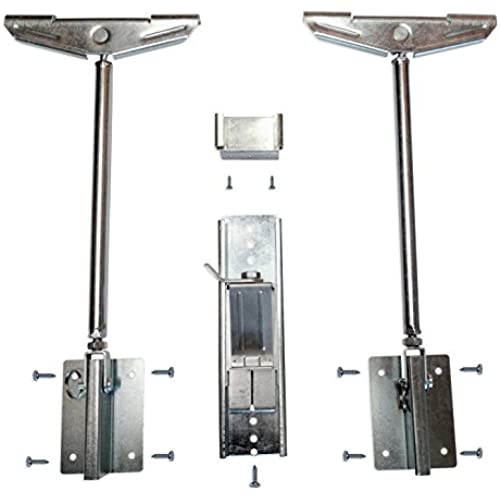


Never Fall Complete Sink Repair system
-

Handy Mike
> 3 dayI do many detached kitchen sink repairs and Ive used 5 different versions of under-mount brackets. So far, these are the fastest ones to install. Because the wide mounts do the job of 2 narrow ones, it saves time and effort. The ratcheting clamp for the front is genius and worked great. You will want a long extension for your driver, and the smallest (narrowest) drill/driver you have to drive the screws in the gap between a double bowl sink. If you have a single bowl sink, I dont think youll be able to install it. There is plenty of adjustment room on them, so if your sink has a gap, youll be able to mount the brackets first, then push the sink back up into place. Slight cons: -It would be nice if the turnbuckles were hexagons so you could fit a wrench on them. But I just used pliers and it worked great. -It would be really great if they could incorporate a spring into the extension that pushed the bracket arm inwards toward the sink. When the gap between the sink and the side of the cabinet is small, you have to hold the bracket against the sink when you tighten it to keep it in place or it can fall over and away from the sink flange. It can be difficult to have 2 hands up in place under many cabinets. -It would be awesome if self-drilling screws were included in the package. I usually replace the included screws with self-drillers because they go in much easier.
-
Sodanotpop
Greater than one weekAbout six weeks ago, my sink dropped on the left side. The sink was attached to the granite with glued on brackets. I didnt know that-who thinks to look for that when buying a house? I bought this product to remedy the problem and it was extraordinarily easy to use. Simply place the arm when you want it, then remove the adhesive backing. This will allow it to stay put while you screw it down to the cabinet. Gently drill the screws in, crank the shaft and lift to the desired height and thats it. I didnt need anyone to help, and finished it in all of 20 minutes. I love it so much that I bought another set for the right side, with was still supported with the glue brackets but knew it was just a matter of time before they failed as well. This product has saved me hundreds of dollars! I could not be more pleased. Im simply thrilled!!
-
N. Williams
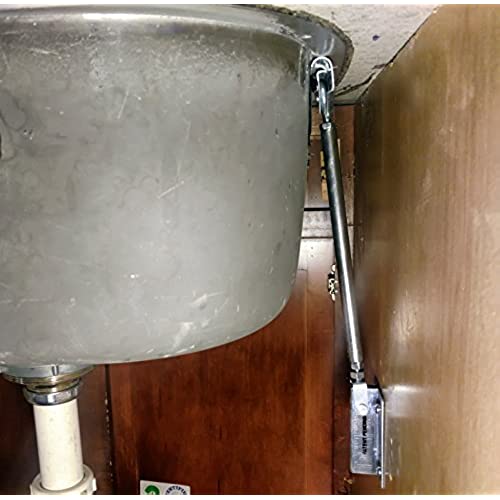
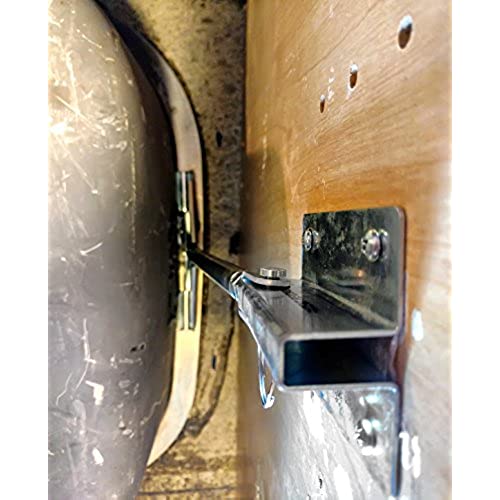
> 3 dayThe Never Fall sink bracket system is excellent. I have a large Elkay undermount sink with very little clearance between it and the cabinet walls. The installers did a crappy job, and the existing mounts failed. But theres so little space around the sink in the cabinet underneath that theres no way I could have epoxyed on new mounting clips. However, I was able to position these brackets in plumb with relative ease using the adhesive strips (which are brilliant), and then affix them securely with the provided screws. Thereafter, lifting the sink into place (with a silicon bead) was quite easy, though I needed pliers to grip the shaft (its a very heavy sink particularly with the garbage disposal attached). Start to finish, the entire job took 30 minutes or less, including careful positioning of the brackets to ensure they were in plumb. My only suggestion to the fabricator would be to spline the shafts on the brackets to allow more grip, but thats a very minor quibble. The sink is now very, very securely in place with seemingly indestructible support. This is a great product.
-
John
Greater than one weekSo after seeing a video on YouTube for this it looked like the perfect solution. That said, for my install the arms were too bulky/awkward to work with the tight space I had. The arms kept flopping down and because there is a lot of play side to side in how they are connected if you need to approach your sink at an odd angle they basically slide out of place. I avoided the simpler other types of these kits on Amazon thinking they would be cheap junk but really I think their simpler design (only allowing movement up and down, not side to side) would allow for less play and a better install in tighter areas.
-
Brannon Barnes
> 3 dayFirst I would like to explain my situation. I have been in my house for 5 years and we were able to design it before we moved in. The granite counter tops were my wife and I choice. So undermount sinks came with the idea naturally. Well it failed and caused us a heck of a whole lot of trouble. I am a handyman and a do it yourselfer, but I am very busy with my personal life,regular career and extra curricular activities. I have tried to overcome the situation by reapplying the braces getting new ones from HD! Well...long story short! These work very well I was wondering why some people say u need two sets but its wonderful for my double sink. If directions and some doityourselfer ingenuity is followed I believe you would never have to buy another kit again even if you upgrade your sink its truly universal!
-
Ron West
> 3 dayInstalled in about 30 minutes
-
KelliPagels
> 3 dayEasy to install, highly suggest!
-
Helper
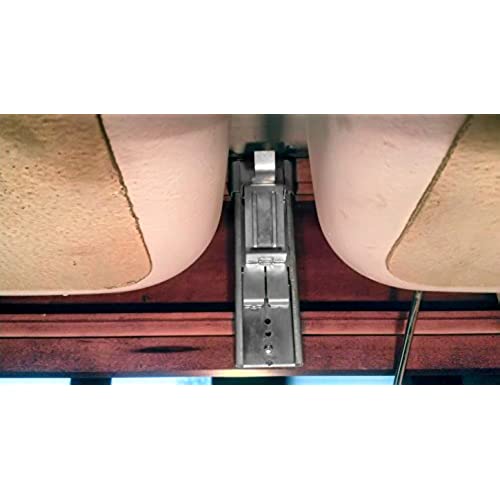
07-06-2025An innovative product from an inventor. It will help any handyman homeowner fix a fallen sink in matter of hours. Our builders plumber did a shotty job by using Epoxy and wood shims pressed against sink lip and granite. I learnt later that this is a common practice for under-mounted sinks on Granite or Quartz. Positives: Easy to install once sink is held in place using sink setters. Slide and lock mount is very handy to support in the front. Cons: The double sided adhesive cannot hold the weight of the bracket.... needs further development Recommendations: The set should include second Slide and Lock for balanced support or seller should create separate set with for larger sinks with 2 Slide and lock mounts. This is highly recommended for offset 2 bowl sinks like mine. I had to buy second set from granite fabricator supplies seller GrandQuartz.com. Seller needs to caution the buyers or installers not to over tighten the mounts as it would start pushing the granite up away from the cabinet or break the joint.
-
Michael
> 3 dayWe have an under-counter stainless sink with granite countertops. Our builder used some kind of cardboard and glue tabs to hold the sink on. Well, that lasted about 5 years. This worked perfectly to lift up the sink back in place. Install: it was not hard but a little messy and time consuming for the home DIYer. Once you remove the sink you need to really clean up the sink top and under-counter area. I did this with a scraper and steel wool. Installing the hardware was simple a few measurements and fit checks were all it took. You do want a partner in this endeavor to help hold and align the sink with the counter. There are a few good YouTube videos showing installation.
-
Miss Ousier
> 3 dayWhen our sink was installed, my husband saw the installer using blocks slathered with epoxy and asked if that was really enough to hold the sink in place. The installer insisted it would be. Six years later, it was not! Our sink came crashing down, and the gobs of epoxy came down with it. The YouTube video that shows how these brackets work opens with “if you’re watching this video, you’re sink has probably detached from the countertop.” Yup. Anyway with two people, reattaching the sink using the brackets was very easy. It took only about 30 minutes. The brackets being adjustable after they are screwed in makes fine tuning the placement of the sink much easier. I wish our installer had told us about these 6 years ago- they are a simple preventative measure to what could end up being an expensive problem. We got lucky our plumbing didn’t get damaged when the sink came out, but it doesn’t always work out that way!