
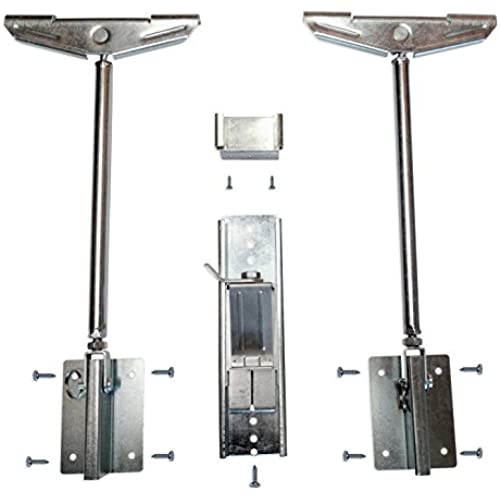


Never Fall Complete Sink Repair system
-

Beverly Billions
Greater than one weekSo easy to do and works like a miracle. Installed this in 10 minutes and I am not a good handy person. Solved a problem that no one else would, including plumber and granite company. Pure genius.
-
Michael
> 3 dayWe have an under-counter stainless sink with granite countertops. Our builder used some kind of cardboard and glue tabs to hold the sink on. Well, that lasted about 5 years. This worked perfectly to lift up the sink back in place. Install: it was not hard but a little messy and time consuming for the home DIYer. Once you remove the sink you need to really clean up the sink top and under-counter area. I did this with a scraper and steel wool. Installing the hardware was simple a few measurements and fit checks were all it took. You do want a partner in this endeavor to help hold and align the sink with the counter. There are a few good YouTube videos showing installation.
-
Angus B. Woodbury
> 3 dayThis product is wonderfully designed. My undermount stainlesss sink had seperated from the countertop. Other people had added bracing and use silicone adhesive but all had failed and it was a mess. I spent quite a bit of time removing all of the residue from the previous fixes and then permanently fixed it with the Never Fail system. Very easy to install and well designed, very sturdy. A+
-
Florine Halvorson
> 3 daysupport the sink very well
-
LRH
> 3 dayBrilliant idea, easy to install. I had to buy two small jacks to raise the undermounted sink, but the whole repair was done in a few hours. Youtube videos also helped me find this solution.
-
KelliPagels
> 3 dayEasy to install, highly suggest!
-
TampaBouy
> 3 dayOur sink after four years just dropped out of place taking with it all the plumbing. Weve looked since late October to find someone who could put it back into place,...with out any luck. NO one wanted to touch it as they didnt want the liability if it happened again. I finally found a local Tampa plumbing company who would. Two days before the install I stumbled across your device on Amazon and ordered it. The installers were hesitant to use it until I showed it to them. The sink was installed with a heavy steel wire that they always used. Before they left the house they had second thoughts and installed it. It went in to place in only minutes and took along with them the info so they could order this product. They told me that this is a major problem with under mount sinks and do at least two a week. So Buyer Beware ! If you have an under mount sink you may just what to order one now so you can be prepared if and when your sink drops out of place.
-
JOHNW
> 3 dayThey were easy to install once you get the sink braced in place until these are attached. Just make sure you have room to mount the side brackets. They are holding my under mount sink nicely.
-
Joe I.
> 3 dayAfter fifteen years the epoxy brackets on the rear of the sink started letting go. Nearly impossible to replace them without removing all the plumbing including the disposal. Bought a set of these and in less than an hour from start to finish I was done. I first cleaned and replaced the sealant around the sink then propped it up using a 20 or so 1×6 to protect the cabinet base from getting damaged. I then used a small bottle jack with a T made out of a 2×4 and then propped up the sink. I immediately cleaned up the sealant before attaching the brackets. Propping the sink also keeps you from having to extend the brackets more than 1/2 or so keeping it from any sort of bending. I did a quick placement off each bracket and drew two rough lines. I removed the bracket from the turnbuckle and drew my lines making sure they were plumb. I then attached the bracket to the cabinet wall and the adhesive backing made it a breeze to predrill my screw holes. I then reattached the turnbuckle. Turned it roughly 4 or 5 turns till snug and tightened up the lockup. Even though my front brackets seemed fine I used the front mounting bracket and that was even easier to install. Very satisfied.
-
Debbie
> 3 dayI am glad I found these, for some reason the marble installers only used glue to hold my undermount double sink to the underside of the marble slab. Of course the sink started showing gaps. I had a handyman install these to close the gaps and to support the sink. These should be a must have for anyone having an unmount sink installed under a stone type countertop.
