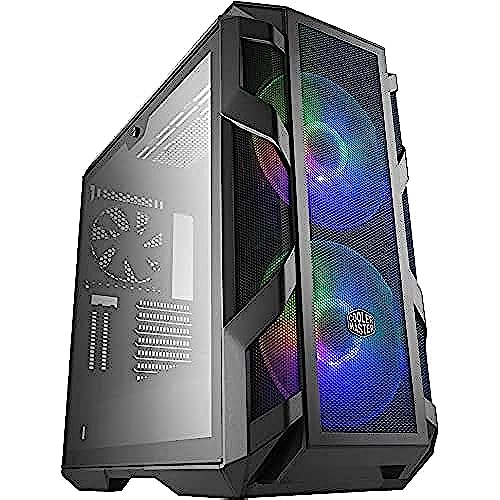
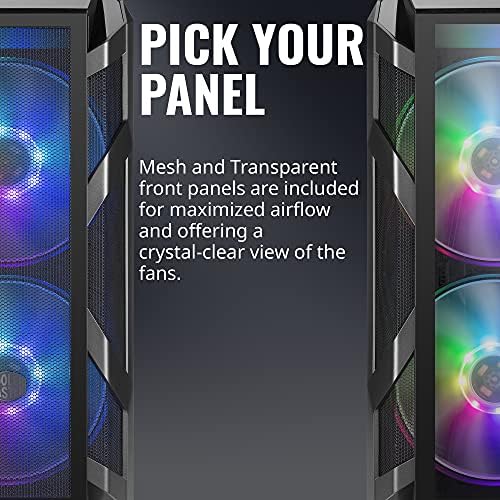
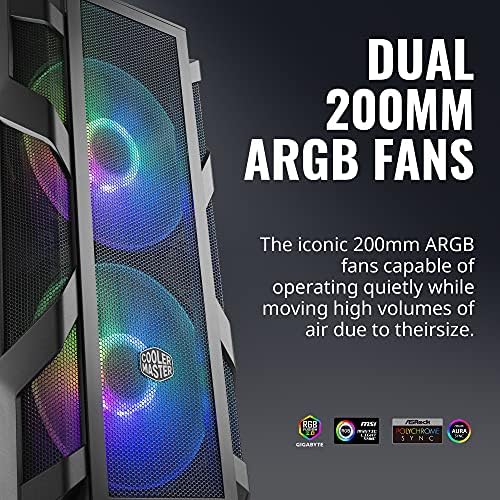
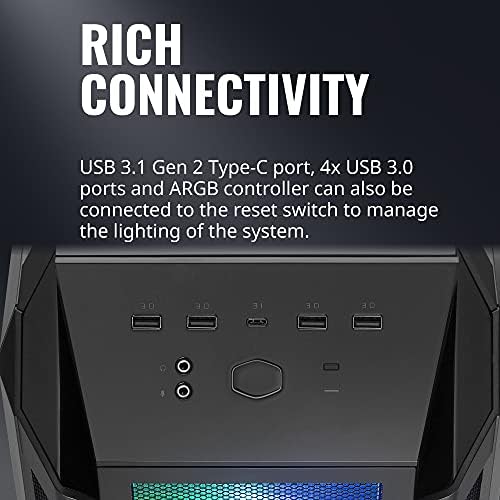
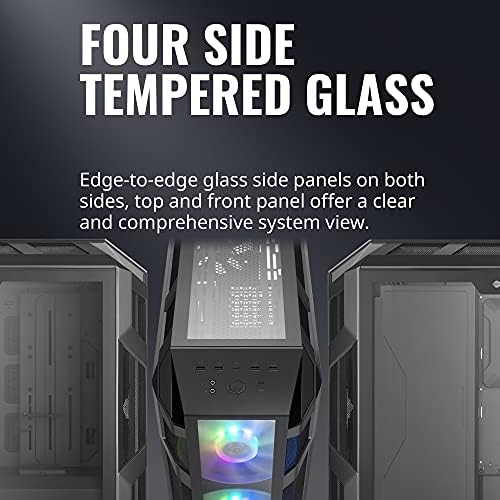


Cooler Master MasterCase H500M ARGB Airflow ATX Mid-Tower with Quad Tempered Glass Panels, Dual 200mm Customizable ARGB Lighting Fans, Type-C I/O Panel, and Vertical GPU Slots (MCM-H500M-IHNN-S00)
-

LARRY PARKER
Greater than one weekThis case is the best out of the CoolerMaster 500 series but I found airflow works best with the 200mm fans on top and DO NOT hook 200 mm fans up to the same hub as all the other fans otherwise all fans will have max speed at 800 RPM. I have 200mm fans into a 2-1 splitter right to mobo. GPU fan is pointless if you have a large video card like RTX 30 series. If you get the case you will be better running fans in the position like I have. The 200mm intake fans are shrouded so 120 or 140 fans work best in front
-
Terricon4
> 3 dayFirst, and most importantly, about two hours after getting and turning on the case and new computer, the back fan started getting... loud. It is now the loudest thing until I turn on a proper 3d game and my graphics card really has to crank up a bit. Something in the internals so I cant just fix it myself easily. Its been a few weeks but no responses from the customer support at all, I know they are busy, but having no reply to your ticket after over half a month is not good. Issues with the broken case fan aside, the two big front fans also dont have the requires screws/nuts to let you mount one of them in the top of the case sadly, as those use a different mounting method than the front. And all issues specific to my product aside, the case just creaks a lot from thermal expansion and contraction. You can easily hear it through headphones sitting next to it when it start, the glass, and the metal both seem to have this issue. At night when I go to bed and turn it off, I often get brought out of my sleep mode by sudden loud creaks from it as it cools. For the record, the setup only has one big graphics card, and Im not overclocking the CPU yet, so the CPU stays around 40C and the graphics card around 70C tops when playing final fantasy 15 on all top settings. So since it creaks just cooling down from normal browsing the internet with a browser temperatures, I think that should highlight that this thing creaks a lot, especially when cooling down from heavy game or going into it. On the upside, the case is pretty solid, it is pretty big so you can fit a lot in it, and its got plenty of vents for good thermals (important when you live in what is practically a desert). It is also worth saying the case should probably not be placed next to a monitor on a desk like mine, the monitor reflects in it and really shows up on the glass side. Its nice to see inside the computer case to spot for smoke or dust levels, but it is kind of distracting when working having a mirror reflection and all that. For instructions, its the standard approach of many cases and products these days of using pictures so they can avoid languages, so one manual fits all countries. But with the cables for the front and other parts, this is not the best. No link to go online for a nice video or multi language instructions either sadly. So for some this can be a bit of a pain depending on your cooling/lighting setup.
-
Paul
> 3 dayFirst thing I did was trash the trashy fans and replace them w/ nocuta everything. Not the easiest to atatch the front 200mm w/ the rubber mounts and was able to get it done with tweezers and floss. Besides that, case is super easy to build. The gpu mount has a flippable switch and you can remove the guards by lifting them up. Due to the mechanism bulk, it makes installing big gpu like 4090 strix a bit tricky since it borders obtructing installation due to the size of the gpu heatsink.
-
Aiden
> 3 dayOne of the best cases I’ve ever used.
-
Vote
> 3 dayExcellent case!
-
Juan Razo
> 3 dayI previously had a case with a front panel that was choking the life out of my parts. After some research, I found this magnificent case. I already had an extra 200mm and 140mm set of fans to put inside, so I swapped over the 200mm Coolermaster fans to the top of the case. The front support for fans seemed a bit off, so I had to use zip ties to hold my own fans in place. It works fine and its pulling in air from two 200mm fans in the front while pushing air out the top and back with one 140mm fan and two 200mm fans. It is all Ive ever wanted. My only gripes are that with so many RGB fans and their own controllers, cable management was not as easy as Id hoped it would be in the back. It is a surprisingly tight fit back there with everything moving around and having to go to its proper place. Also the USB plugs for the front of the case just dont work well with my motherboard when it comes to the slots for cables built-in to the case. I opted to have them not plugged in at all because they were either sticking out the side, or they were bent trying to enter from the bottom. Actually bent my USB pins on my motherboard because of this. So, my advice is to try and get them plugged in on the opening from the right, and not the bottom.
-
Th3PwnyExpress
> 3 dayGot this for my son for his first gaming pc build. Compared to the build on my pc in a corsair x570 the cooler master H500 was quite a bit easier to build in. The PSU shroud is removable and reinstallable after its all wired and that helped make the PSU installation and wiring a little easier. There are also a couple of small openings underneath the motherboard (using an ATX mobo) that made running all the bottom row front panel and usb connections easy to install and easy to cable manage. The dual 200mm RGB front fans look awesome ! ! ! and quieter than i thought they would be. 4 usb inputs on the front panel (usb2.0x2 and usb3.1x2) is the kind of overkill i like. Definitely worth spending the extra bucks over going with a bargain bin $30-50 case unless you are really pinching pennies on your build. Looks way nicer than its price would suggest. The instructions that came with the case for wiring were pretty much non existent but if you cant tell the difference between a fan connector, rgb connector, or usb connector you just need your mobo manual, a little common sense, and maybe a google search or two. Overall Im very happy with this case.
-
Lee Haddix
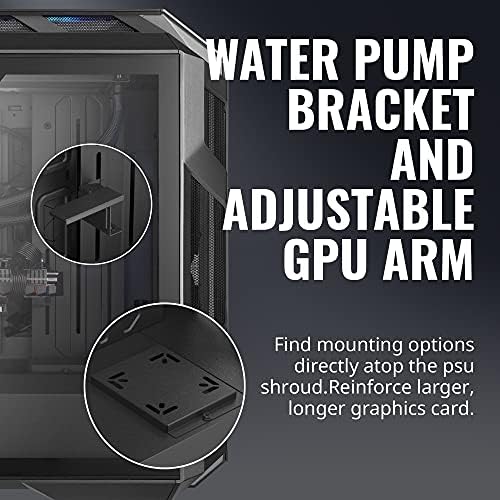
Greater than one weekIve happily used Cooler Master cases since the HAF, but was disappointed with the H500s airflow when I switched to it in 2017. However Im glad to say Cooler Master regained their footing with the H500M. It keeps my favorite things about the H500 design, and greatly improves several shortcomings I had to deal with. The top panel no longer sits loosely on the case so if I needed to carry the case out, I can do so without having to take it apart or worrying about dropping it. The top radiator/fan mount is now 360mm instead of 240mm max so I was able to mount a larger radiator for cooling. It has a USB C port on the front, FINALLY. Theres even a discreet built in GPU mount for the saggiest of video cards. But most importantly of all, this thing is an AIRFLOW BEAST. 10900k at 5.2 sits around 50c on full load, 3080 doesnt go past 65c on full load. With the newest GPUs pulling so much power its more important now than ever to get a good airflow case. If you liked the style of the H500 but were turned away by lack of airflow, the H500M is the case for you. My one con, if I had to say something, would be that although it supports EATX just fine, the cable shroud you would usually tuck your 24 pin behind sits flush with the side of the 24 pin terminal on my motherboard, at least. I was able to route my 24 pin extension around to the other side of the shroud in an aesthetically pleasing way so no real issues. Just keep that in mind. Other things about this case worth mentioning: The dual tempered glass side panels make this case heavier than normal but it gives it a nice symmetrical look and sheen. You wont have to worry about errant cords being visible through the glass because with the entire H500 line there are several wire panels that hide your mess, keeping that nice clean look no matter how much your cable management sucks. The top panel is still not meshed except for side vents but there is noticeably more headroom between the case frame and top of the panel allowing for excellent exhaust flow. The two front 200mm fans are markedly improved from their H500 versions, with more LEDs and quieter bearings. The PSU and HDD shroud below can be configured in many ways, but if you have a 360 radiator for the front intake and want to keep the shroud, there is fortunately a slot that pulls out from the front enabling that particular configuration. Its listed as a mid sized tower and it is, but the H500M is large for its class. Roughly 22 inches tall, 21 inches deep. Its main feature is excellent airflow, but the H500M should be noted as being a very modular case, and can accommodate many kinds of builds. I was almost tempted to go custom loop because of the built in pump bracket and space for two 360 rads.
-
Ning chen
> 3 daySo ...I custom build a Mid- High range gaming desktop with this case , first top quality for sure ! 99% metal and glass Constructed , awesome design with many ways for customizability that all you need from a mid tower , this is a bigger size mid tower which what I looked for , removed the Sata storage parts , since I got 980 pro M.2 , and it was blocking the airflow of the front lower fan , now more room & airflow ! I also added the universal raiser rack now can see the look of this 6900 XT i think this is what it designed to look like ? Considering will add the LED near -GPU , now is like a beauty hiding in dark ! ,very fast WiFi adaptor . I love this case sure it worth the price ! Specially when you got nice hardwares , the out-look should be stunning for sure
-
KevinM
> 3 dayI am extremely happy with this case. There is a video around somewhere on YouTube where they did review on cooling with this and like 20 other cases. Not only did it come out near the top but it was also one of the cheaper ones. It definatley lives up to that. The cooling is great. I only added one extra 140mm fan at the top vent and set it as an extra exhaust fan. I have a 2080 nvidia and an i7-9700k processor with a cpu cooler that is probably not good enough for that CPU. I run a temperature tracking program and my cpu and gpu dont get hotter then about 62c during heavy gaming at max settings. Its all very quiet too. My old gaming laptop seems like a loud boiling jet engine now. For my first pc build i found the directions were easy to understand. The important screw holes and cords in the case are also labeled so its easier to know what to do when putting it together. The carrying handle feels sturdy so far, i transport the desktop around to friends houses to play vr games. Overall highly satisfied.