
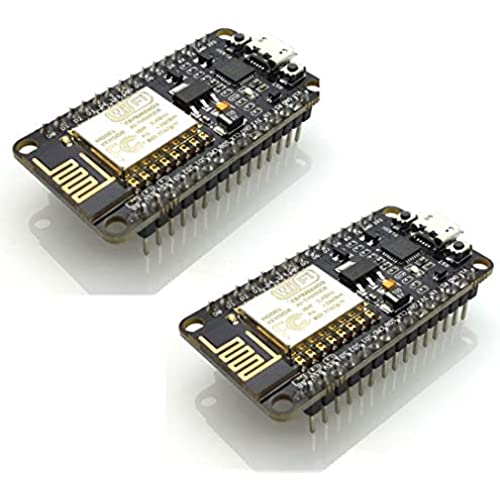

HiLetgo 2pcs ESP8266 NodeMCU CP2102 ESP-12E Development Board Open Source Serial Module (Pack of 2PCS)
-

marco s
> 3 dayBox came alittle crushed but both units work great. Good deal
-
Jesse Nelson
> 3 dayI don’t have a clue how to use them , I just bought them because I could
-
Mike
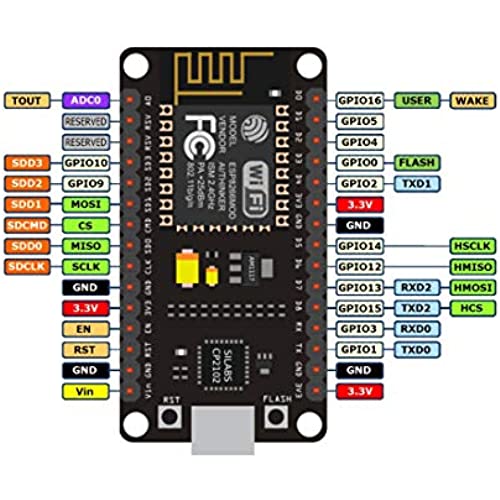
Greater than one weekThere are some really weird quirks with this board. The first is the most obvious in that its a 3.3v device only. Meaning youll need to use an external power source for any 5v modules youd like to use with it. Next up is loading sketches. While it does work with the Arduino IDE software that other board use it takes a bit of massaging to get things up and running. Even more so if you want to use the serial monitor to view messages from the device. Finally the printed labels on the board dont match what the pin actually is. If you connected to the pin labeled D0 on the board and wanted to read an input you wouldnt read 0, youd read 16. Want to read D1? Thats actually pin 5. D2? Thats 4. D3? Nope its not 3. Its 0. That caused me more aggravation then anything else with this board. Make sure to lookup a pinout graphic if your working with this board and keep it handy. All that aside it works well, connecting to my wifi was a piece of cake with the included library and I was able to control my Philips Hue lights using this board and a library from Github. Not a bad board for IoT development, but far more frustrating than it needs to be.
-
James Taylor
> 3 dayGood quality
-
Ronald D. Brown
> 3 dayworked for me
-
Glannicus
> 3 dayAll the git gud u need in a smol package... dont up the price HlG....
-
Wohn
> 3 dayThey work great, do everything they should, only issue is the LDO has high quiescent current (not HILETGO fault, they all use the same part) but its easy to swap out if you intend to use for battery power devices.
-
Sagar M.
> 3 daypin headers are soldered on. Theyre not shady about it, I just didnt notice. But heads up if it doesnt work with your application
-
Frank W.
> 3 dayComplete project description follows. Im using the NodeMCU as a web server and it works great. It was a struggle to find example code that actually connects outside my local area network but I found some. Also had to learn the rudiments of HTML. Only issue is it seems to need to be restarted every 4 or 5 days. Since Im going to leave it in a remote location Ill put some code in the MEGA that sits right next to it to restart the NodeMCU every couple days, by pulling the RST pin low. Green Pond Bridge Boat Clearance At ‘very low tide’ the clearance under Green Pond Bridge in Cape Cod is 6’6” or less and that is too low for the boat I use. The tide charts for Falmouth, MA are theoretical and can vary as much as 18” from what is actually happening at the bridge. This system monitors the clearance and transmits the information on the internet. All of these parts were purchased from Amazon. Transmitter An (Arduino) Elegoo UNO R3 board is connected to an Elegoo HC-SR04 Ultrasonic Distance Sensor. The UNO and the sensor calculate the distance from a fixed dock to the sea level, then transmit that data using a MakerFocus NRF24L01 Wireless Transceiver to the Receiver described below. The Transmitter sits on the end of a dock where there is no power, so the UNO, Transceiver and Distance Sensor are powered by the energyShield 2. This battery has special capabilities – it wakes everything up every 15 minutes. The system takes a couple readings of the distance to the water then transmits that data, then the battery shuts it all off. The data transmitted includes information from the battery – time, date, and voltage. I have been testing this unit at home (in Dallas) and it has been operating outside, for about 20 days. Based on battery drain it looks like it will operate for about 4-5 months before it needs a recharge. When the temperature drops below zero the system still works fine but the voltage reported in the battery seems low. All of this is housed in a plastic box printed for the purpose with a FlashForge 3d Printer Creator Pro, using eSun White ABS+ filament Picture below. Receiver An (Arduino) Elegoo MEGA 2560 R3 is connected to another NRF24 Transceiver to receive the data. The MEGA does the math to convert the distance from the dock to the water, to the bridge clearance. Then the information is displayed on an Elegoo UNO R3 Touch Screen (that also works fine on the Mega). Picture below. A small plastic frame for the Receiver was also printed on the 3d printer Web Server Finally, the information in the MEGA is transmitted over a serial bus to a Hiletgo ESP8266 NodeMCU ESP-12E Internet WIFI Development Board (Also operates using Arduino IDE programming). This board is connected to the MEGA via the XCSOURCE Logic Level Converter and powered by a UCEC MB102 Breadboard Power Supply Module. All mounted on an Elegoo Breadboard. The ESP8266 is programmed to be a web server. It connects to the internet through the modem/router provided by AT&T. Picture of my cell phone below.
-
Torrey Franecki
> 3 dayBought for my IoT project with Amazon AWS. I plugged in to my MacBook Pro with existing drivers. Flashed well on first attempt and started working like a magic. Id definitely recommend this product.

