
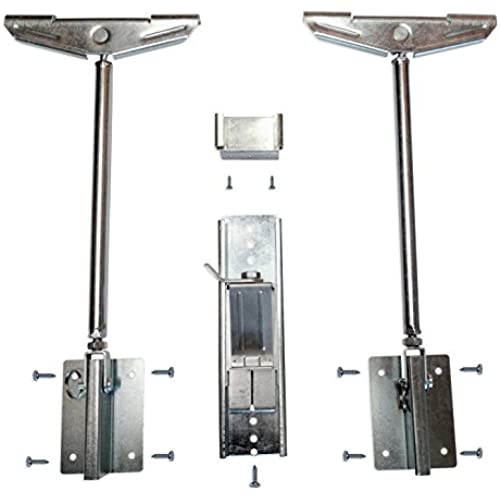


Never Fall Complete Sink Repair system
-

laura
> 24 hourOur kitchen sink fell in a few weeks ago because the gent who owned our house before us used industrial glue instead of the normal bracket kit. We bought this as a hail Mary since none of the hardware stores had what we needed. And it more than did the job!
-
Ferg
> 24 hourThis product did what it needed to do to repair a bad installation by a licensed contractor. I installed it myself with absolutely no issues. It says it can support over 600 lbs and I believe it. Cant believe that the contractor didnt use something similar to this. But as long as their poor installation lasts until the warranty expires, they are happy.
-
Beverly Billions
> 24 hourSo easy to do and works like a miracle. Installed this in 10 minutes and I am not a good handy person. Solved a problem that no one else would, including plumber and granite company. Pure genius.
-
Angus B. Woodbury
> 24 hourThis product is wonderfully designed. My undermount stainlesss sink had seperated from the countertop. Other people had added bracing and use silicone adhesive but all had failed and it was a mess. I spent quite a bit of time removing all of the residue from the previous fixes and then permanently fixed it with the Never Fail system. Very easy to install and well designed, very sturdy. A+
-
LRH
> 24 hourBrilliant idea, easy to install. I had to buy two small jacks to raise the undermounted sink, but the whole repair was done in a few hours. Youtube videos also helped me find this solution.
-
silly goose
> 24 hourMy sink came with mounting hardware that required me to drill holes to the underside of the cabinet. I really didnt want to do that or spend money on tools Im only going to use once. I feel like the screws could eventually come loose from the countertop. Also, I wanted an easy way to remove the sink if I ever wanted to replace it or do any kind of repairs. So, I gave this a shot even though it says it is a sink repair system. I figure if it can support 680lbs, then it should work as a sink install system. Can I use this never fall system without the sink mounting hardware? I hope so. Maybe the company can chime in on this. Anywho, it has been about 2 weeks since I installed it. You need roughly 2-2.5 inches on both sides for the thing to fit. It seems sturdy enough, but I havent been able to put it under any kind of stress since the water is not yet hooked up. I couldnt use the extra support bracket because I dont have anything in the front to attach it to. Company said it would be fine, so I hope they are right. I may end up adding in some wood support. Only complaint at the moment is that turning the turnbuckle can become difficult if there isnt enough clearance on both sides. I couldnt ensure that I had fully hand-tightened it because my hand didnt fit in the gap. The only way I could test was to wiggle the turnbuckle to see if it moved. I will update to see if it holds up after I start using the sink.
-
beachwife
> 24 hourI bought this to lift the portion of my under mount stainless steel double sink where it had separated from the granite near the faucet (exterior wall side of sink). At least for me (and Im fairly handy), it seemed difficult to attach to the sides lip of the sink because I tried that approach first. Of course, it is difficult to work under a kitchen sink, due to position and lack of room, even when everything stored underneath is removed. I eventually got the results I wanted using part of this kit - the front support worked great to lift the front of the sink (by cabinet doors). I wound up using one of the main supports with sheetrock anchors to mount to the rear wall and then positioned it differently than in the instructions to put tension on the rear part of the sink and lift it back into place. This probably isnt ideal, but it seems secure and the combination of the supports and a little silicone sealant got the results I wanted. I think it will work great on a new installation, but it would be good if there was a bracket to secure the side of the sink near the faucet as well as a front support.
-
Tom
> 24 hourThe undermount sink in my kitchen became detached from the countertop. It sunk down and, in turn, was causing an issue with the pipes since they were sized to fit from the original position. Im not that handy of a guy, so got immediate anxiety about who Im going to need to call and how much. Did some internet searching and found this product for a very reasonable price. I figured it was worth the try. From opening the package to having it installed...took under an hour. Its been in place now for a few months and Ive had zero issues. I deviated from the instructions a little regarding where to install the arms (front & back vs on the sides, etc.), so keep that in mind if you feel another spot would be better. But this thing was a lifesaver and I highly recommend.
-
Florine Halvorson
> 24 hoursupport the sink very well
-
Melanie
> 24 hourThis works really well!! I have a double sink, and there was no problem with the middle sagging as someone mentioned. I admit I did not do it, but it took just a few minutes, and with an electric screw driver, and it was a done deal! A lot of folks in the plumbing/construction industry dont want to mess with a falling undermount sink, especially when granite is involved. This easily solved the problem.

