
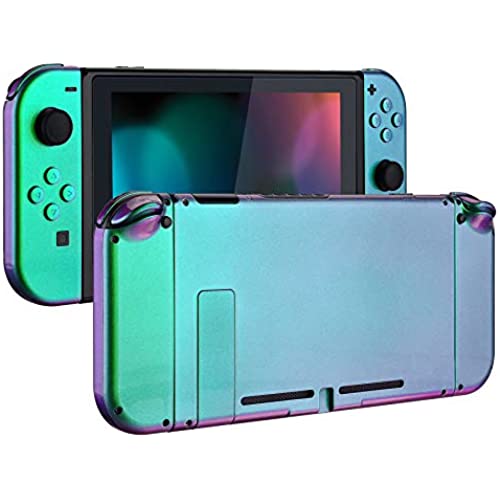
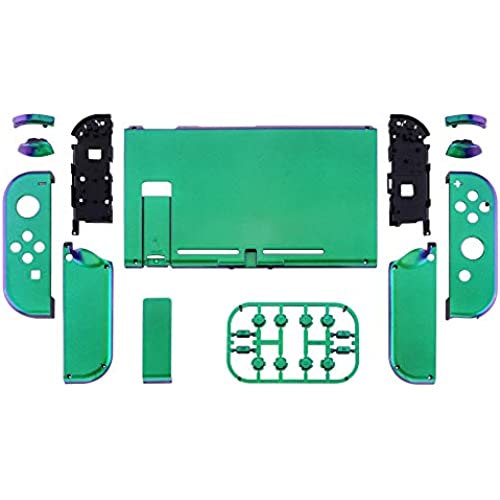


eXtremeRate Glossy Back Plate for Nintendo Switch Console, NS Joycon Handheld Controller Housing with Full Set Buttons, DIY Replacement Shell for Nintendo Switch - Chameleon Green Purple
-

Abby Lynn Sullivan
> 24 hourThis product is amazing!!! I was surprised that I got no written instructions but I found YouTube installation videos. The quality was great and it looks so flawless! I would totally buy again and would recommend!
-
Ash F.
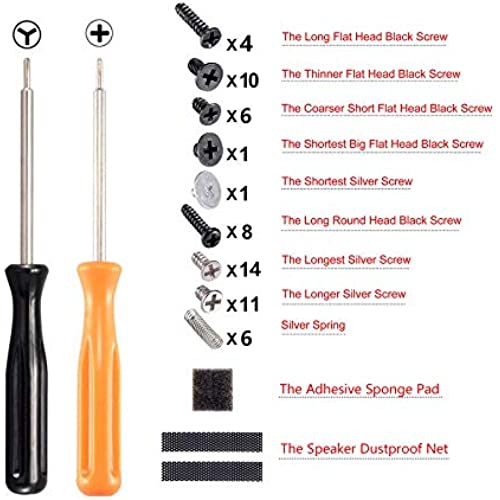
> 24 hourIf this is your first time doing something like this, I highly recommend following a video reference. You will need a separate screw driver to remove the original casing on your Switch as the one that comes in the kit does not fit the stock screws. Other than that, it was pretty easy to assemble and looks amazing once youre done!
-
Anonymous
> 24 hourI gave it 3 stars because the “T” screw driver is very hard to use and so I couldn’t change the back plate at all(so I had to apply a sticker). It also hurt my hand because of the style of it. I’m gonna have to buy a separate set to change it but other than that it’s very nice and I would do it again.
-
Cierra Singleton
> 24 hourAllow me to preface with the information that I am a complete novice to any kind of repair, home or electronic. My apartment consists of a pitiful toolbox of a hammer, ruler, and hand screwdriver, of which, I have no idea what kind of screws it is meant to actually use. I went into this with bright, wide eyes hoping with naive innocence it would be a fun, easy process if following a tutorial. I began my journey at 3pm. At 8pm, I was finally able to rest, and after a few tweaks later in the night, I rested easy, proud of the work I had accomplished. Behold....her. In all seriousness, I firmly believe that this is something any novice can learn to do. I, however, did not use the tools that came with it. It seemed nice enough, Metal with magnetized removable tips, but after fighting with the backplate, I used the additional tools that I had purchased. I recommend purchasing another set anyways, strictly due to the fact no tweezers comes with this set. Now, onto the process. I am still uncertain if my issues with the backplate were due to my tools or me not knowing how much pressure was needed (a lot!) or a combination of the two, but in fear of stripping my screws I saved the backplate for last and went immediately to my left and right joycons, which, were less of a hassle than the backplate was for me. Take your time with this! If you find yourself getting frustrated just move on to a new screw and go from there, or use a new tool. Don’t keep trying to push a square peg into a round hole. Using tweezers helps lessen the chances of ripping one of the delicate ribbon cables, and just take your time with the process. Unless you have done this before, it is going to take a long time, and that’s okay. I’m really happy with the end result, and I feel confident that I could do this again if I had to.
-
Donald Mcsherry Jr
> 24 hourI like the design the dislike was how hard it was to change
-
Brandon House
> 24 hourThis skin is an excellent addition if youre trying to make your Switch look unique. I bought my Switch second hand and it had the blue/red theme and I wasnt a fan. I bought a dark case to make it look better and that did the job. Once I upgraded my docking station to the smaller silhouette (https://smile.amazon.com/gp/product/B071YVC3NJ/ref=ppx_yo_dt_b_asin_title_o01_s00?ie=UTF8&psc=1) Amazon recommended these skins and I was sold. One review recommended to not remove the ribbons. If possible, I would recommend that too. The clips that hold them in place are fragile and I messed up my left joy-con. If I want to play multi-player, I can no longer use the left bumper on that joy-con. Learning from my mistake, I only removed one ribbon on the right joy-con (bumper) and it works great. I added the protective case I previously bought (pictures). I like how it gives it a darker a red look (https://smile.amazon.com/gp/product/B07G8ZXGPQ/ref=ppx_yo_dt_b_asin_title_o02_s00?ie=UTF8&psc=1). The skin holds the system tighter too, so it doesnt feel as cheap as the stock skin. If I didnt already buy the protective case, I would happily use the system without. It has an excellent grip and quality feel. Would gladly buy again!
-
Max
> 24 hourThis thing is fantastic. Build quality is great, color is stunning, comes with a TON of spare parts (included tools aren’t great but they never are). Everything fits perfectly. Only one problem: I think it may be slightly thicker than the housing that came stock with the switch, and a clear plastic snap-on cover for the switch and joycons doesn’t fit over top of them now. Not a complete disappointment, but would have been nice to know.
-
Stephanie Velez
> 24 hourDecided to get these to switch out my original switch shells and im really happy with the result. Price i feel is good for the quality of the shells and it also comes with new screws you can use and the buttons to switch them out in case you have the colored joy cons. The process itself wasn’t difficult but i would definitely recommend watching their video before even starting the process. I did this and it helped me have a idea of what to expect. The kit comes with the two main tools you need but highly recommend getting your own small tool kit. If you decide not to, be careful and very patient with the screws and try not to force them too much to avoid stripping. DEFINITELY get a pair of tweezers since they come in handy with the cables on the joy cons and the screws. The shells have a soft matte finish so i bought a hard clear case to use over it to protect the finish (and also some stickers i ended up putting on the back). Overall is a great little project to do but just have in mind that you are going to need to have time in your hands (took me around 3 hours to do everything since i was being extra careful). I also had the video loaded up while in the process to make sure i was doing everything right. Patience is key but oh so worth it! PS: have in mind that if your switch is less than a year old if you change the shells this may void any manufacturer warranty it may have. I bought my switch second hand so i had no problem with doing this.
-
Devin
> 24 hourGot this cause the back of my switch was cracked and the switch back itself was easy and fairly straightforward the joycons though are on a whole nother level there are lots of ribbon cables you need to work with so I suggest at least looking up a guide for that, if I could suggest anything for the supplyers I suggest adding a pair of cheap tweezers for the ribbon cables in the joycon to make it a bit easier to pull them out though I love that it came with a triwing screwdriver the philups one stripped a screw so I suggest making that a bit smaller bit all around great product if you know what your doing GET THIS if not look into the install process and see if its something you can do cause it looks and feels great
-
N
> 24 hourI just installed it today and so far Im really impressed. The quality is great but Ill update this if I ever notice any discoloration or other issues. I also didnt use the included buttons, more out of personal preference. The included ones look fine though. Consider buying another button set color before you disassemble it. After you install one, you probably wont want to do it again. A few tips Im not sure Ive seen others mention yet... - Set aside a bright space and some time to work. It can take 1-5 hours depending on your tech savviness and how delicate you can be. - Watch the youtube video once all the way through at 2x speed just to see the process, then watch it slower and pause step by step as you go. Its not hard but its tedious, so you should know what youre getting into. - Keep track of where each screw goes, and then make sure to use the same size from the new kit. I accidentally used too long of a screw in a joycon and I made a small bump on the front surface. Much farther and it would have been a hole. - I dont think the included screwdriver was bad, the real issue is the Switchs original screws, especially on the back plate of the switch body. But it helped having a second magnetic precision screwdriver set because youll be switching back and forth between phillips and tri wing a lot as you disassemble it. I used my own Y0 screwdriver for the trickier ones, with a rubber band. - Use a wide rubber band between the tri tip screw and screwdriver to give it more to bite onto. Dont wait until you already started stripping it, do this for every screw. Trust me. - Test buttons as you put it back together, not only at the end, to make sure theyre aligned correctly. I had problems with this a few times. The same goes for docking the joycons on the body; I had the release button turned 90° and it didnt lock correctly. - Since the shell holes arent threaded, dont overtighten them. When screwing directly into the shell, turn it just until you start to feel a little more resistance. Do what you can to avoid unscrewing and rescrewing in the same spot, because its easy to strip the plastic. - Last, squeeze the joycon shell together before you set the last 4 screws to make sure things are aligned, especially the ZR/ZL and any stray ribbon cables. (dont force it!)
