
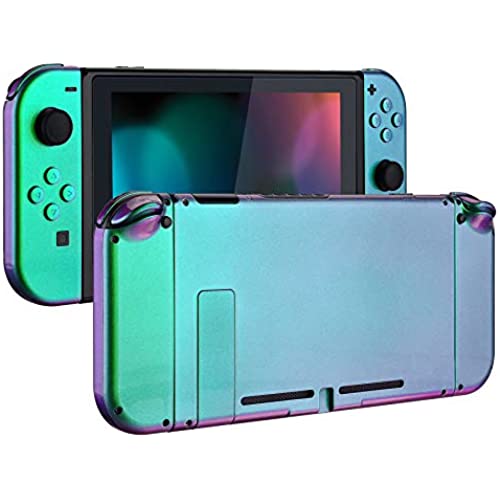
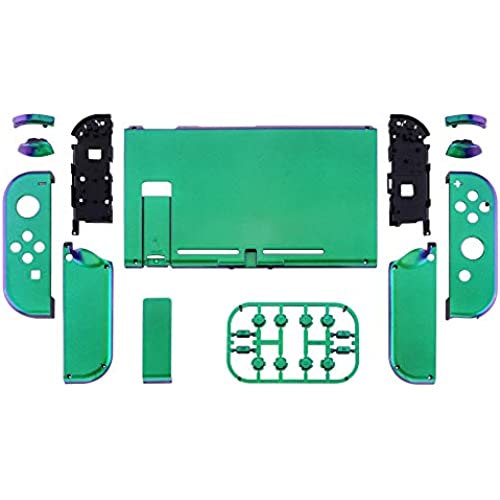

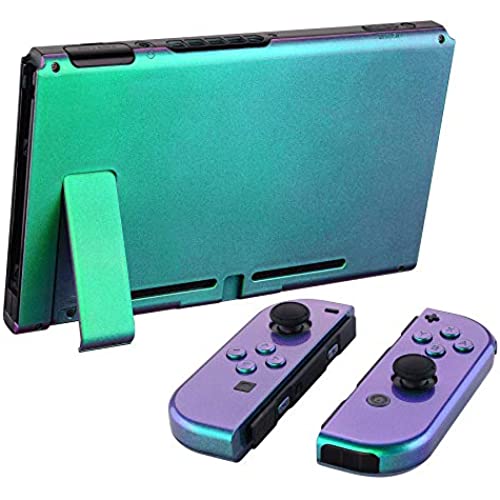


eXtremeRate Glossy Back Plate for Nintendo Switch Console, NS Joycon Handheld Controller Housing with Full Set Buttons, DIY Replacement Shell for Nintendo Switch - Chameleon Green Purple
-

MJ85
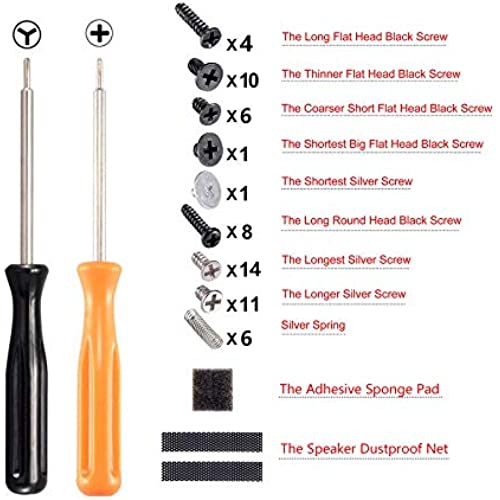
> 3 dayThis is s great case. It looks beautiful. Installation is sort of easy but dont expect the video tutorial to help. You just watch a guy do it fast and he doesnt track any screws or mention any things to take note of. All the screws are different sizes so your on your own to guess which ones go where. I didnt even use the tutorial after watching the beginning and I was fine. Some cables are finicky and the right controller is much harder than the left. The new kickstand blows, dont use it. Use the original black one, gives Good contrast anyway. The screw driver they give you kinda sucks. It has 2 heads and one is always loose and falls out. Maybe its for a reason, who knows. Video doesnt tell you. Overall very happy with it. Dissapointed in the kickstand, tools and the useless tutorial.
-
Tyler
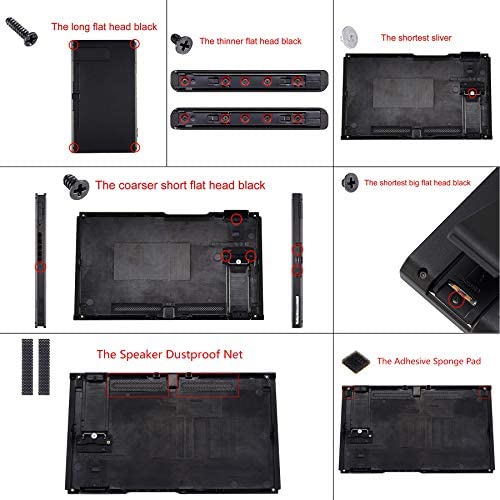
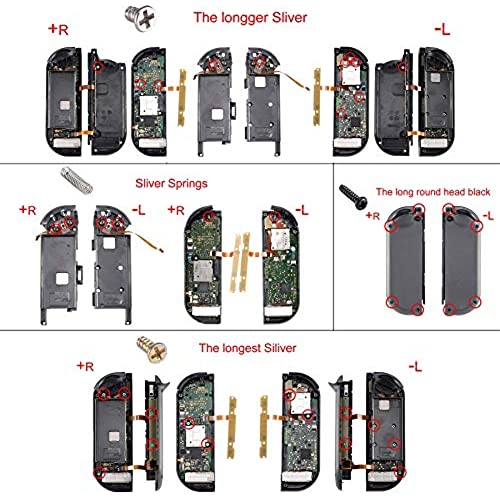
Greater than one weekTo help a few buyers thinking about buying this. Some advice. 1. Make sure you have your own tools. The ones provides are not quality. I broke the tip of the Phillips without much pressure. 2. If youre like me and refuse to watch YouTube to figure anything out. It took me about an hour to do the first left joycon. I recommend taking a photo of how it was as you take it apart and separate and label your screws. 3. When you do the back plate for the switch. There is a center screw on each side where the joy cons go that hold the back in place. I didnt know that and ended up breaking part of the original backing. Not horrible since I was wasnt using it anymore but still. It took me about 1.5 hours to complete. I highly suggest you get tweezers and a head light. You dont have to use the buttons that come with the shell. I ended up just keeping all the buttons from the original and I think it looks better than the plan black that came with the shell. Overall I am happy with the product. Wish it came with instructions but other than that. If youre an DIYer you should be fine. Just take your time. The most difficult part was putting the zl and zr triggers back in since the springs needs to be in a certain position for it it function properly.
-
Amanda
> 3 dayThis product is wonderful and SUPER easy to apply! The smooth casing is so soft to the touch and the color (I got Sakura Pink) is beautiful! It is slightly a darker shade and on my left joycon, one area is sliiiightly misaligned but but thats my OCD. Tips for the newer model: ❌ YOU DONT HAVE TO REMOVE EVERY SCREW. When replacing the back of the switch, you dont need to unscrew the 5 black screws where the joycons slide in! Save yourself stress and stripping them (like I did) by just leaving the sides alone. ✅ BUY A DIFFERENT Y-SCREWDRIVER. I cant stress this enough. The one it came with is not adequate. I stripped at least 4 screws and had to use the replacements they send you. I got one for $5 on Amazon. SPEND THAT EXTRA MONEY. With the new one, I was easily able to remove screws. ✅ KEEP AN EYE ON WHERE YOUR SCREWS GO. They are so many sizes and its hard to keep track. I drew out a map of where to put them since I didnt want to not know where one goes. ✅ DONT BE AFRAID TO PULL UP THE BATTERY OR THE SENSOR AREA ON THE BOTTOM OF THE RIGHT JOYCON. There is strong tape there and all you have to do is put some gentle muscle into it. I was afriad of breaking anything so I went particularly slow. You dont have to go snails pace, but just be careful for the wires. ❌ DONT JUST GO WITHOUT DOUBLE CHECKING WHERE YOU REPLACE EVERYTHING. I did at ome point on the joycon and something came loose. The buttons are hard to get to stay at times and if something feels not 100% secure, DOUBLE CHECK. These are just tips and honestly, I didnt use any tutorial or video to put mine on. Im not a mechanic, but common sense and keeping track of what you take apart is all you need. Watching the video for a second made things more stressful (and made me remove screws I didnt have to) then just working on it myself. Be observant, inspect what goes where, and expect AT LEAST 2 HOURS of working on it. I did it slowly over 2 days and the results came out beautiful! ⭐⭐⭐⭐⭐ P.S. The white buttons I purchase from the same company here on Amazon and they are PERFECT!
-
Gina
> 3 dayIt’s very beautiful and soft! I love the feel of it. It was pretty straight forward to put on the switch and the screw driver was actually pretty decent. When you take apart the joy-cons and put them back together it’s a lot simpler than you would think, just take you time and pay attention to what you’re doing. It’s took me around 2 hours in all to do. The only two complaints I have is that on the shell for the switch, the screws and holes didn’t match up as well on the bottom. The other thing being that the part on the joy-con is black! I really wish it was white like the rest of the shell :( I have included pictures to show what I mean. Overall, I thought the shell is very nice and to the point. P.S. I plan to update this review after a few months to include how well it keeps up :)
-
alanni
> 3 dayI love it so much, imma pink girly so it matches me so much. I originally had the animal crossing shell, had since it came out and was over it. But, it was very complicated to assemble. I tried doing it myself, but got overwhelmed and found someone to do it for me. He even messed with the programming the controllers would pop up as pink on the switch. Overall, worth it but if you’re not good with tech, just find someone to do it.
-
Abby Lynn Sullivan
> 3 dayThis product is amazing!!! I was surprised that I got no written instructions but I found YouTube installation videos. The quality was great and it looks so flawless! I would totally buy again and would recommend!
-
grumpybear25
> 3 dayI’ve been wanting to change the look of my switch for awhile. So I finally took the plunge. I love the color and texture of the material. Had a bit of an issue when doing the back plate. Extreme Rate was very helpful when I explained the issue and very fast at getting me a new back plate. Overall so happy I did this.
-
Juliana Becher
> 3 dayI never leave reviews but I felt like it was necessary for this product so everyone is aware of some of the challenges you may encounter when installing this shell. I’ve previously used extremerates shells when replacing shells for pro controllers so I figured I would try my hand at customizing my switch and joycons. Overall the quality of the actual shell is great. It’s soft to the touch and when it’s all put together it’s beautiful. With the red shell I also bought the gold buttons to go along with it. It wasn’t THAT hard to put together once I figured out the best way to do it, and the YouTube video that eXtremerate put together helps a ton. Here is the BAD part.... the tools that came along with the kit are AWFUL. I started out with trying to put together the switch shell, since I figured it would be slightly easier than putting together the joycons... and the very first screw I touched with the included tools ended up getting stripped beyond belief. As soon as I realized the screw was stripped I immediately stopped and went to the store and bought a real 000 Phillips head screwdriver set, but it was too late to save my switch. I tried everything that was suggested online to get out the stripped screw out (rubber bands, super glue, flat head screwdriver, etc) but nothing worked, and now my switch is beyond the point of fixing and I won’t be able to replace the shell unless I take a chance with an actual drill to get this dang screw out. Luckily with the new screwdriver set I was able to successfully put together the joycons... but not until after I had to absolute MUTILATE the original Joycon shell since 2 of the Y screws got stripped.. AGAIN. Unfortunately the screwdriver set I bought at the store was only Phillips and I didn’t have any other Y screwdrivers besides the included one so I had to uhhhh make due with what I could do. After literally cutting through the original shell to get the guts out of the joycon, I was able to replace the shell successfully and now my joycons look pretty. The actual quality of the shell is great and I do appreciate the fact that the kits come with extra screws and springs because I definitely know I needed them since almost all the Y screws were damaged beyond repair, but FOR THE LOVE OF GOD please buy your own tool set and save yourself the headache of dealing with a cheap junky screwdriver that will just ruin every screw it touches. I’m giving this 3 stars because even though my switch is ruined and I can’t replace the back plate, I still like the final product of my joycons. I just wish I knew ahead of time to buy my own tools so I could’ve successfully put the back plate on too so everything could match :(
-
GuyFlannigan
> 3 dayI decided to not bother with the video guides as Im pretty familiar with repairing electronics. No issues whatsoever with the back plate on the Switch. Taking apart the Joycons for the first time really gave me an appreciation for how well theyre designed (as well as the cost associated with them). So much packed into a tiny housing. I would highly recommend a set of tweezers - curved and straight; they come in extremely handy for the ZL/R ribbon cables and their springs. The right Joycon ZR ribbon cable doesnt give you a lot of room to reconnect it. Take your time, use the tweezers (CAREFULLY), and try to reconnect it before screwing the main board back down. The left ZR springs are the only real issue on the left side. The ribbon cable was infinitely easier to work with than the right. Great little kit and very nice to have a full set of replacement screws/springs for when one inevitably flies off somewhere.
-
~Krishna~
Greater than one weekLike everyone else says this takes time and patience. I was doing great until I got to the joy cons and thats where I messed things up. The tools given were not the best. Takes a lot of time to finish! Helped but also almost stripped the screws of my switch. Came to the point where I decided to take it into a repair shop and get it done by professionals rather than me continuing to messing it up. So well see what it looks like in a few weeks. Color was pretty though. A very light pink color which goes perfectly with my desk aesthetic! Rate 3/4. Great once done I think but the process to get it done was a pain in the butt which is why I docked off two stars. My charging port was easy to change so I recommend doing that first. Color was pretty.


