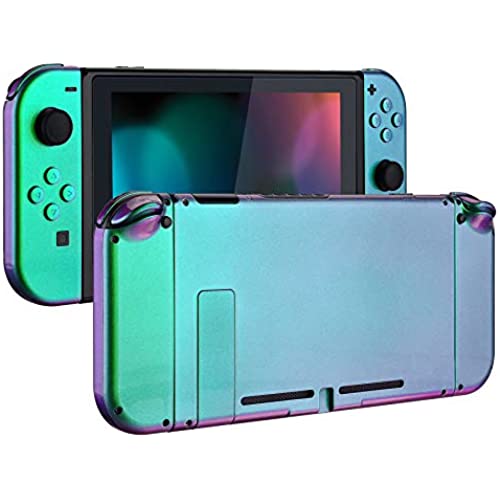
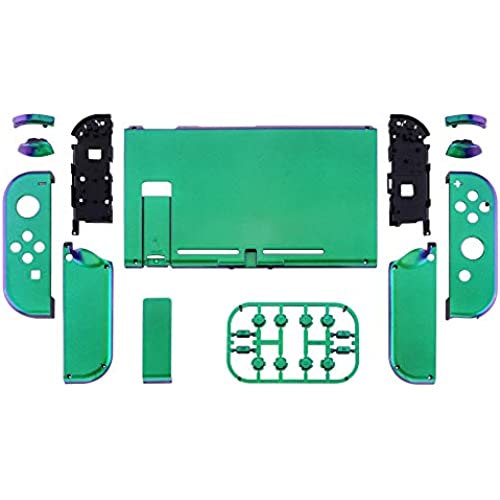

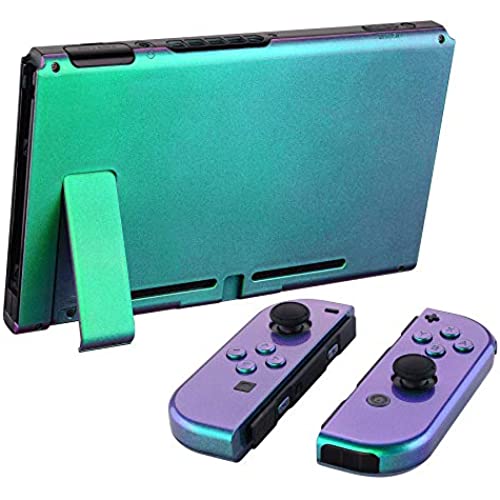
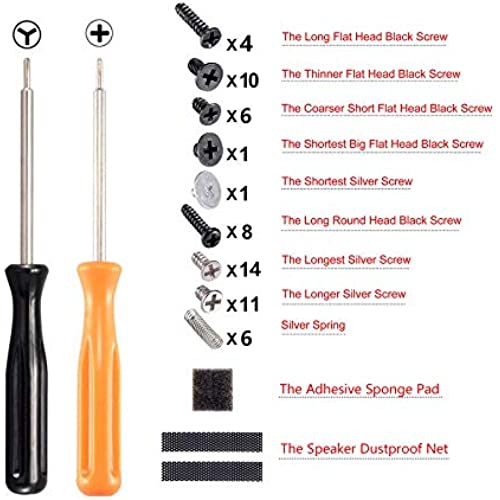
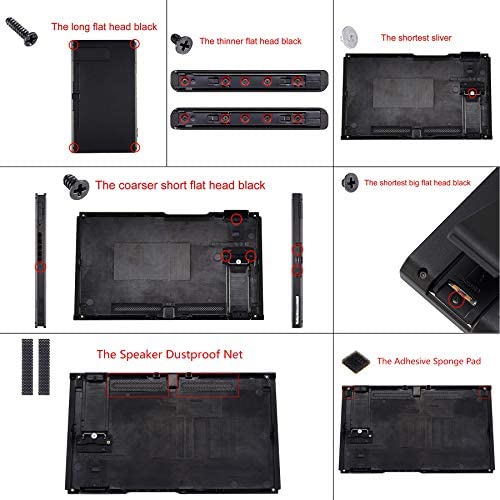
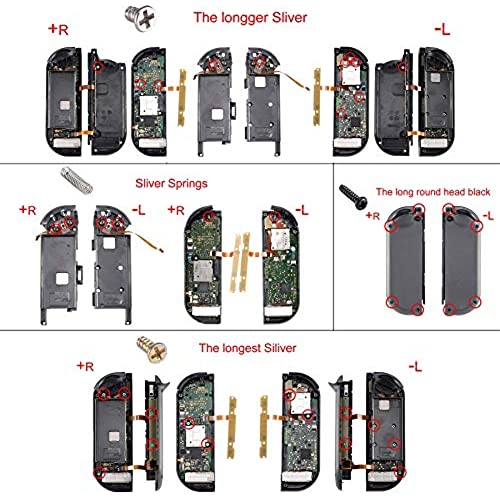


eXtremeRate Glossy Back Plate for Nintendo Switch Console, NS Joycon Handheld Controller Housing with Full Set Buttons, DIY Replacement Shell for Nintendo Switch - Chameleon Green Purple
-

Sho
> 3 dayThese Switch back plates are a great way to make yours stand out. My main goal was to simply make mine the color of the consoles marketing: Red. This particular, red plate has two bonuses: 1) it has a velvet-like feel that is pleasant to touch, but will not distract during gameplay. 2) It has a white under-layer, which makes it ideal for further customization. You can take the plate to a place that specializes in plastic engraving and add clean, custom designs to your switch that will last. The only downside to this set is the kickstand. If you NEED to use the kickstand, you will need to be extra careful with it, as it is more prone to snapping off. If it does snap off, it is easy to reassemble without tools, but my table-top usage is rare and that happens, I use third-party stands, like my SwitchCharge battery pack or the Hori USB stand. Get this kit. Most of you wont use the kickstand.
-

Aimee
> 3 dayUpdate, 6/14/2021: I purchased the translucent cherry pink color as the original sakura pink I had purchased in the original review below began to have a discolored kickstand after a few months. I had the entire switch in a clear case which protected everything else, but alas the kickstand didnt survive the inevitable discoloration that other reviews mentioned. I should have just replaced the kickstand with a black one and left everything else alone. This whole project has been a nightmare. The cherry pink shell looks great, it comes up on camera as a peachy color but in person its a nice pretty pink. It doesnt have that soft-touch material that Extremerate uses which is prone to discoloration, hence the reason I bought the color I did. After installing the new shell and their white buttons for both my pro controller and switch, I used the kickstand all of maybe three times before the little pegs that hold it closed completely snapped off. Mind you, I am gentle with my technology and I am very aware that the kickstand is fragile to begin with. But this level of fragile is unacceptable. My sakura pink kickstand has NO issues opening and closing after a year of use, its just discolored to the point of it looking nasty now. So dealing with the now barely-closed kickstand that comes open when you happen to brush your finger across the bottom, I also now deal with the buttons discoloring. (That review is an entirely different can of worms, but basically, dont buy anything of Extremerates that is pastel or light colored.) Dont be fooled by the review picture here, those buttons werent white for long. They discolored within a few hours of use and the photos here were taken after a fresh install. I presume the SL/SR shoulder straps will eventually discolor as well, since those are also the same texture as the buttons. My advice if youre going to purchase one of their shells/buttons, get a dark colored version, or the hard plastic ones such as the translucent or the iridescent ones. And dont expect your kickstand to survive from basic use, either. This review gets 3 stars because both shells do their job and everything fits together nicely. The sakura pink shell was sturdy and lasted me until I decided to change it a year later, but its discoloration docks a star. The cherry pinks immediately broken kickstand docks another star. ***ORIGINAL REVIEW: About the product: I purchased the sakura pink color, and I had to wait for it to be in stock again due to it being so popular. Definitely worth the wait, though! The color is beautiful and the plastic definitely does feel nicer than the stock Switch plastic, however Ive put a case on mine to prevent any sort of paint chipping or yellowing that other reviews mention. Im currently using the FYOUNG dockable clear case, available here on Amazon. If anyones curious, the HEX code I used for changing the color of the joycons in the Switchs software is F4B6A5. About the install: Ive never taken apart a Nintendo Switch before, and this process took me about two or three hours. I watched several videos beforehand while I waited for the shell to get here, and I must have learned something, since I had no issues taking apart the joycons or putting them back together. I highly recommend the tweezers that have a sharp, angled tip to help with this process as fingers are just too cumbersome to deal with such tiny ribbon cables and screws. The included screwdriver with two interchangeable tips wasnt bad, but I think thats due to my Switch being refurbished. I didnt have any issues unscrewing or stripping any of the screws, but your mileage may vary. Pros: Professional quality Beautiful color Precision fitting Everything finally matches and I no longer have neon red/blue joycons Very nice plastic, pleasing to touch and hold Cons: My only real complaint with this shell is that the SL/SR buttons and the middle plastic between the ZL/ZR and L/R buttons are not sakura pink in the same fashion that the neon red and blue joycons have neon red and blue in these places, respectively. However, I do understand that these areas are not major parts of the joycon, so Im not docking any stars for that. Its just a minor personal preference that I can easily overlook because the included black parts go just fine with it as well. TL;DR: This shell is very high quality and worth the time and effort. Just go slow, keep your screws sorted (definitely dont over-tighten them), and youll end up with a result thats gorgeous.
-

john p.
> 3 dayExtremely nice outcome but man I didnt know what I was signing up for when I got this. Its a ton of tiny screws and clips involved with this one took me about 3-4 hours to install but looks great
-

DigitalBanshee
> 3 dayThe coloring of the case is quite cool. My pictures don’t really do it justice but the gradient purple to blue shifts as you tilt it in the light. The case doesn’t feel too bad, it’s quite smooth and I didn’t see any faults in the design or structure of it. Everything fits together snug and the kit comes with the screwdrivers needed to take the beast apart. The tools that came with it worked really well! They have a little magnetic power to them so they picked up most of the screws. I’ll be keeping these for another project in the future. So I have zero experience with putting a new case onto any system. A complete newbie here. Luckily I had been exposed to a YouTube video prior to buying this case. Thought it looked cool and figured why not try it since I have to replace the joysticks anyways (which I also got at the same time as this case kit). The video I found used the same case and had a step by step tutorial on how to do it. I followed it and actually got it to work. Only thing I did different was based on personal preference; I didn’t use all of the purple buttons. I felt that there needed to be some more black throughout the case to make it more unified. I did use the purple button casings for the interior buttons (the ones that rest against the switch itself) as I didn’t want bright red and blue buttons on a purple case. You definitely need patience if you’re a beginner like me. It took me 4 hours to do because of some trouble with ribbon cables and getting 3 of my screws out of my switch. (They assembled it pretty darn well, making the screws difficult to deal with. But that has nothing to do with the kit). Just a warning though. Do be careful about the screws that nintendo has on their system. They strip really easily! And yes, if I know someone that would like to change up their switch. I’d buy this kit or another one of their styles. I am very pleased with how this turned out!
-

Juliana Becher
Greater than one weekI never leave reviews but I felt like it was necessary for this product so everyone is aware of some of the challenges you may encounter when installing this shell. I’ve previously used extremerates shells when replacing shells for pro controllers so I figured I would try my hand at customizing my switch and joycons. Overall the quality of the actual shell is great. It’s soft to the touch and when it’s all put together it’s beautiful. With the red shell I also bought the gold buttons to go along with it. It wasn’t THAT hard to put together once I figured out the best way to do it, and the YouTube video that eXtremerate put together helps a ton. Here is the BAD part.... the tools that came along with the kit are AWFUL. I started out with trying to put together the switch shell, since I figured it would be slightly easier than putting together the joycons... and the very first screw I touched with the included tools ended up getting stripped beyond belief. As soon as I realized the screw was stripped I immediately stopped and went to the store and bought a real 000 Phillips head screwdriver set, but it was too late to save my switch. I tried everything that was suggested online to get out the stripped screw out (rubber bands, super glue, flat head screwdriver, etc) but nothing worked, and now my switch is beyond the point of fixing and I won’t be able to replace the shell unless I take a chance with an actual drill to get this dang screw out. Luckily with the new screwdriver set I was able to successfully put together the joycons... but not until after I had to absolute MUTILATE the original Joycon shell since 2 of the Y screws got stripped.. AGAIN. Unfortunately the screwdriver set I bought at the store was only Phillips and I didn’t have any other Y screwdrivers besides the included one so I had to uhhhh make due with what I could do. After literally cutting through the original shell to get the guts out of the joycon, I was able to replace the shell successfully and now my joycons look pretty. The actual quality of the shell is great and I do appreciate the fact that the kits come with extra screws and springs because I definitely know I needed them since almost all the Y screws were damaged beyond repair, but FOR THE LOVE OF GOD please buy your own tool set and save yourself the headache of dealing with a cheap junky screwdriver that will just ruin every screw it touches. I’m giving this 3 stars because even though my switch is ruined and I can’t replace the back plate, I still like the final product of my joycons. I just wish I knew ahead of time to buy my own tools so I could’ve successfully put the back plate on too so everything could match :(
-

Chris Ellav
> 3 dayEverything about this product was perfect. However, Nintendos cheap Y screws are crap. Gladly replaced the screws once I got em out, with the provided tools and extras given. I’ll be buying another color way soon. I highly recommend this to anyone wanting it. Fair warning, be careful with the Y screw, they’ll easily muck up an install.
-

Shawn C Hunt
> 3 dayEnjoyed the process of doing this project the joycons feel much better as mine were loose on the system now they feel tight and new again. Just look up a review online on how to replace the case take your time and dont hammer the screws in the system and you will do it. To be fair I have previously repaired phone in the past and on occasion still so I have experience doing a repair like this. The tools are an added bonus my only complaint was the new buttons included dont use them unless you seriously want them I like the original ones so I used my original joycons buttons. The color is clean and the soft back is nice even if its a finger print magnet. Good stuff.
-

Lei Lee
> 3 dayI really wanted this to work and I followed the great advice in the other reviews - I bought 3rd party tools and followed the video exactly, but the newer Switch models have the screws glued in so they are harder to get out. Even with the better tools the 2nd screw I tried immediately stripped and couldnt be removed. My Switch is brand new and I didnt want to risk damaging it so I decided not to proceed - and I couldnt really anyway at that point. I may have been unlucky with mine, so if youre brave enough to try the final results are probably worth it. I did do this successfully with the Pro Controller housing from eXtremeRate and it looks awesome. But I just didnt want to risk damaging the console so I think Ill try a custom skin instead. Also, I ordered the Heaven Blue color and hoped it would be a little more Tiffany (aqua) blue bit its pretty much straight up baby blue.
-

Jorge Andrés Cediel
> 3 daySe nota que la calidad es excelente, el tacto en mi opinión es incluso mejor que el original, es más suave. Perfecto para darle una segunda vida a tu Switch, que en mi caso es de 2017 y ya estaba bastante rayada
-

Amanda
> 3 dayThis product is wonderful and SUPER easy to apply! The smooth casing is so soft to the touch and the color (I got Sakura Pink) is beautiful! It is slightly a darker shade and on my left joycon, one area is sliiiightly misaligned but but thats my OCD. Tips for the newer model: ❌ YOU DONT HAVE TO REMOVE EVERY SCREW. When replacing the back of the switch, you dont need to unscrew the 5 black screws where the joycons slide in! Save yourself stress and stripping them (like I did) by just leaving the sides alone. ✅ BUY A DIFFERENT Y-SCREWDRIVER. I cant stress this enough. The one it came with is not adequate. I stripped at least 4 screws and had to use the replacements they send you. I got one for $5 on Amazon. SPEND THAT EXTRA MONEY. With the new one, I was easily able to remove screws. ✅ KEEP AN EYE ON WHERE YOUR SCREWS GO. They are so many sizes and its hard to keep track. I drew out a map of where to put them since I didnt want to not know where one goes. ✅ DONT BE AFRAID TO PULL UP THE BATTERY OR THE SENSOR AREA ON THE BOTTOM OF THE RIGHT JOYCON. There is strong tape there and all you have to do is put some gentle muscle into it. I was afriad of breaking anything so I went particularly slow. You dont have to go snails pace, but just be careful for the wires. ❌ DONT JUST GO WITHOUT DOUBLE CHECKING WHERE YOU REPLACE EVERYTHING. I did at ome point on the joycon and something came loose. The buttons are hard to get to stay at times and if something feels not 100% secure, DOUBLE CHECK. These are just tips and honestly, I didnt use any tutorial or video to put mine on. Im not a mechanic, but common sense and keeping track of what you take apart is all you need. Watching the video for a second made things more stressful (and made me remove screws I didnt have to) then just working on it myself. Be observant, inspect what goes where, and expect AT LEAST 2 HOURS of working on it. I did it slowly over 2 days and the results came out beautiful! ⭐⭐⭐⭐⭐ P.S. The white buttons I purchase from the same company here on Amazon and they are PERFECT!
