
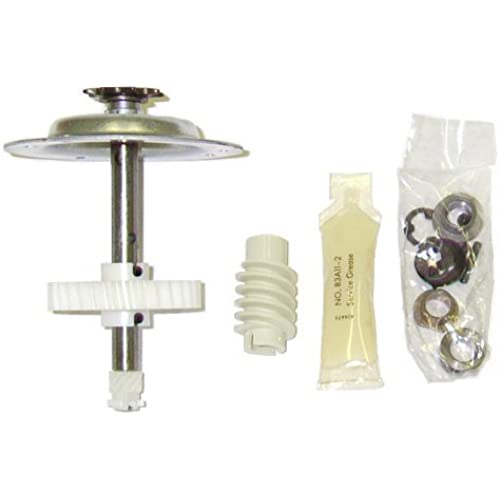
Liftmaster 41c4220a Gear and Sprocket Kit for Chamberlain, Sears, Craftsman and LiftMaster 1/3 and 1/2 HP Chain Drive Models
-

Chris
> 3 dayExcellent product ! Watch the YouTube video and your all set ! Save hundreds!
-
Kurt S.
> 3 dayPerfect fit great instructions
-
stargazer423
> 3 daygreat rebuild kit, and reasonably priced. It was a great it came with all the different bearing types because I have an old unit and I needed them.
-
marcus k cortez
> 3 dayGarage door opener works like new!
-
Gary L. Mink
> 3 daysuch quick delivery and it fit perfectly, thank you much
-
JESSE J FRANK
> 3 dayGreat product works on and older version garage opener.
-
E. Sun
> 3 dayWhat a life saver...local company wanted $95 just to come out and look at the problem. This kit is a bargain!
-
Garrett
> 3 dayI used this kit to rebuild the drive shaft on a 20 year old Sears opener. The large nylon gear had turned into a fine white powder inside the cover. i bought the whole kit just in case I needed more than the one gear replaced. When I got the old shaft out, my laziness took over and I just replaced the large gear. Once reassembled, the door works great. If I have the same issue down the road, I have the rest of the kit, and I will just need a new large gear, which can be had for just a couple of dollars.
-
John H.
> 3 dayKit came with all the needed parts and installed easily. Thanks!
-
JayTee Video Master
> 3 dayOur Liftmaster door opener was installed when the house was built 15 years ago and worked well. A balance coil spring broke on our garage door and I called and had the springs properly replaced. While they were there, I asked if they replaced stretched door opener chains. They looked at the opener and said they see it all the time , but it is the shaft on the Liftmaster opener that is worn. They also pointed out that this happens often because the opener limit adjust was set so that there was too much down force on the door when it is closed. Essentially, if the Liftmaster if set with too much movement downward, it stresses and wears the drive shaft and gears. So. . . . after they left I ordered this repair kit and also replaced the old flattened out seal on the bottom of the garage door. Very simple. . , and most home supply stores have them. When the door opener repair kit arrived, I installed as per videos (also found some steps have work arounds for less disassembly) . After getting the kit installed, there are two limit switches that should be adjusted. One is for how far the door opens. The other, is for how far it PUSHES the door down when it is closed. This is the important part. . .. set the down limit switch (not the Down Force) so that the door seal (get a new one) on the bottom of the garage door JUST lightly compresses. If you do not bother to properly set the down limit switch . .. then every time the door is closed it can stress the door opener shaft and gears by making it force the door down too hard against the concrete floor. NOTE . . it is also good to check the down limit switch at least yearly as it can go out of adjustment over time.

